SAR Features service tutorial
![]()
Find SAR Features service specifications here.
Select the processing service
After the opening of the Geohazards workspace or the Hydromet workspace of the CopernicusLAC Platform open the Processing Services panel by clicking on the button located on the top right of the map.
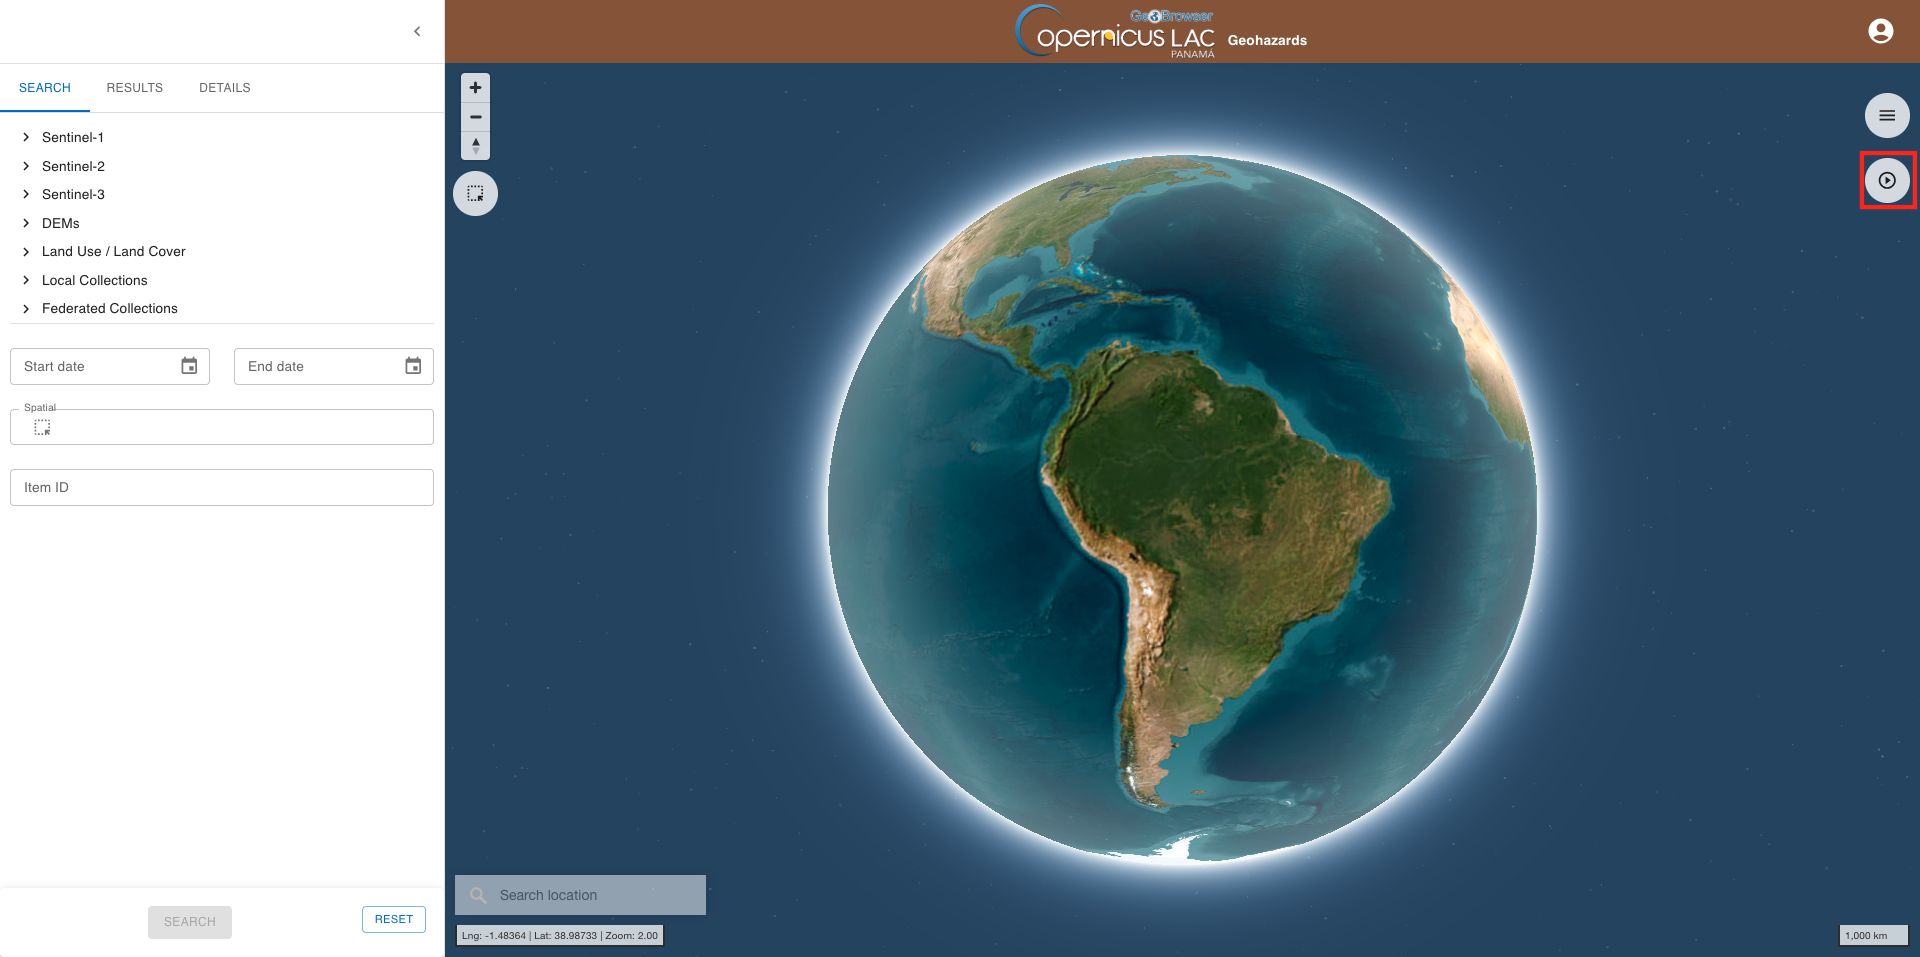
The Processing panel will be displayed with the list of on-demand services available for this workspace.
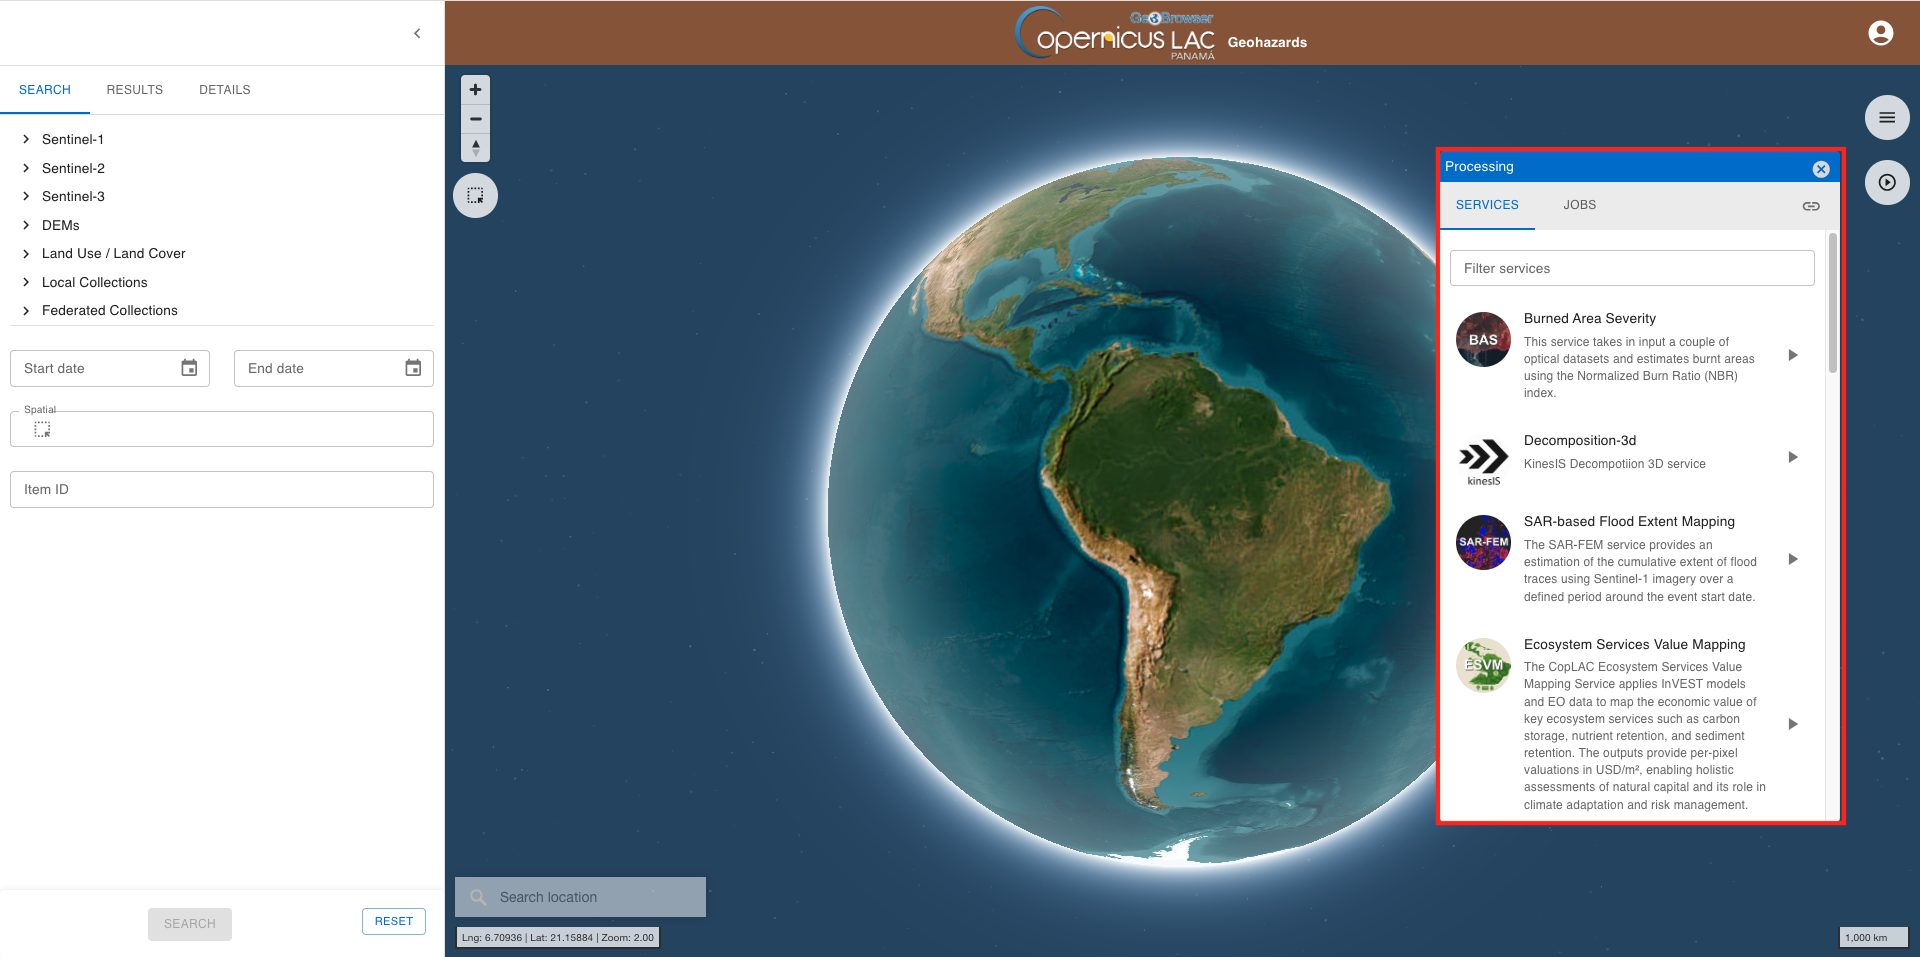
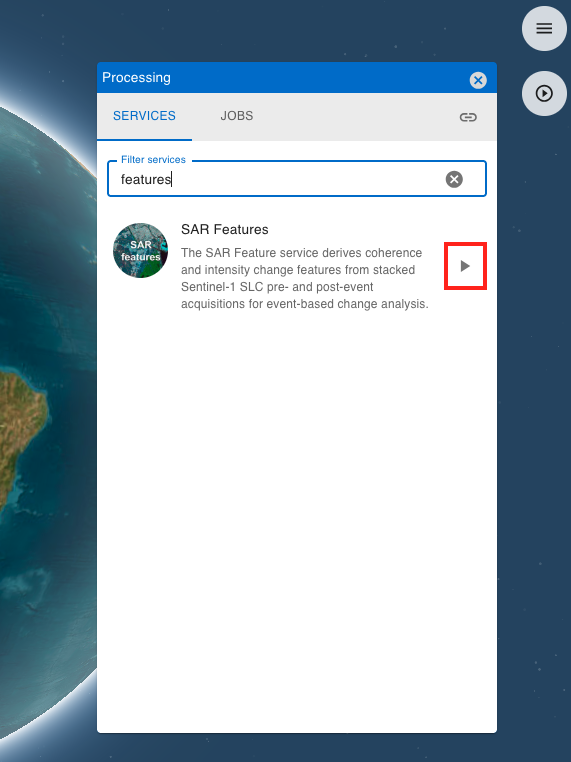
Find the SAR Features service from the list, or by using the free text filter under Filter services, and click on the button next to it.
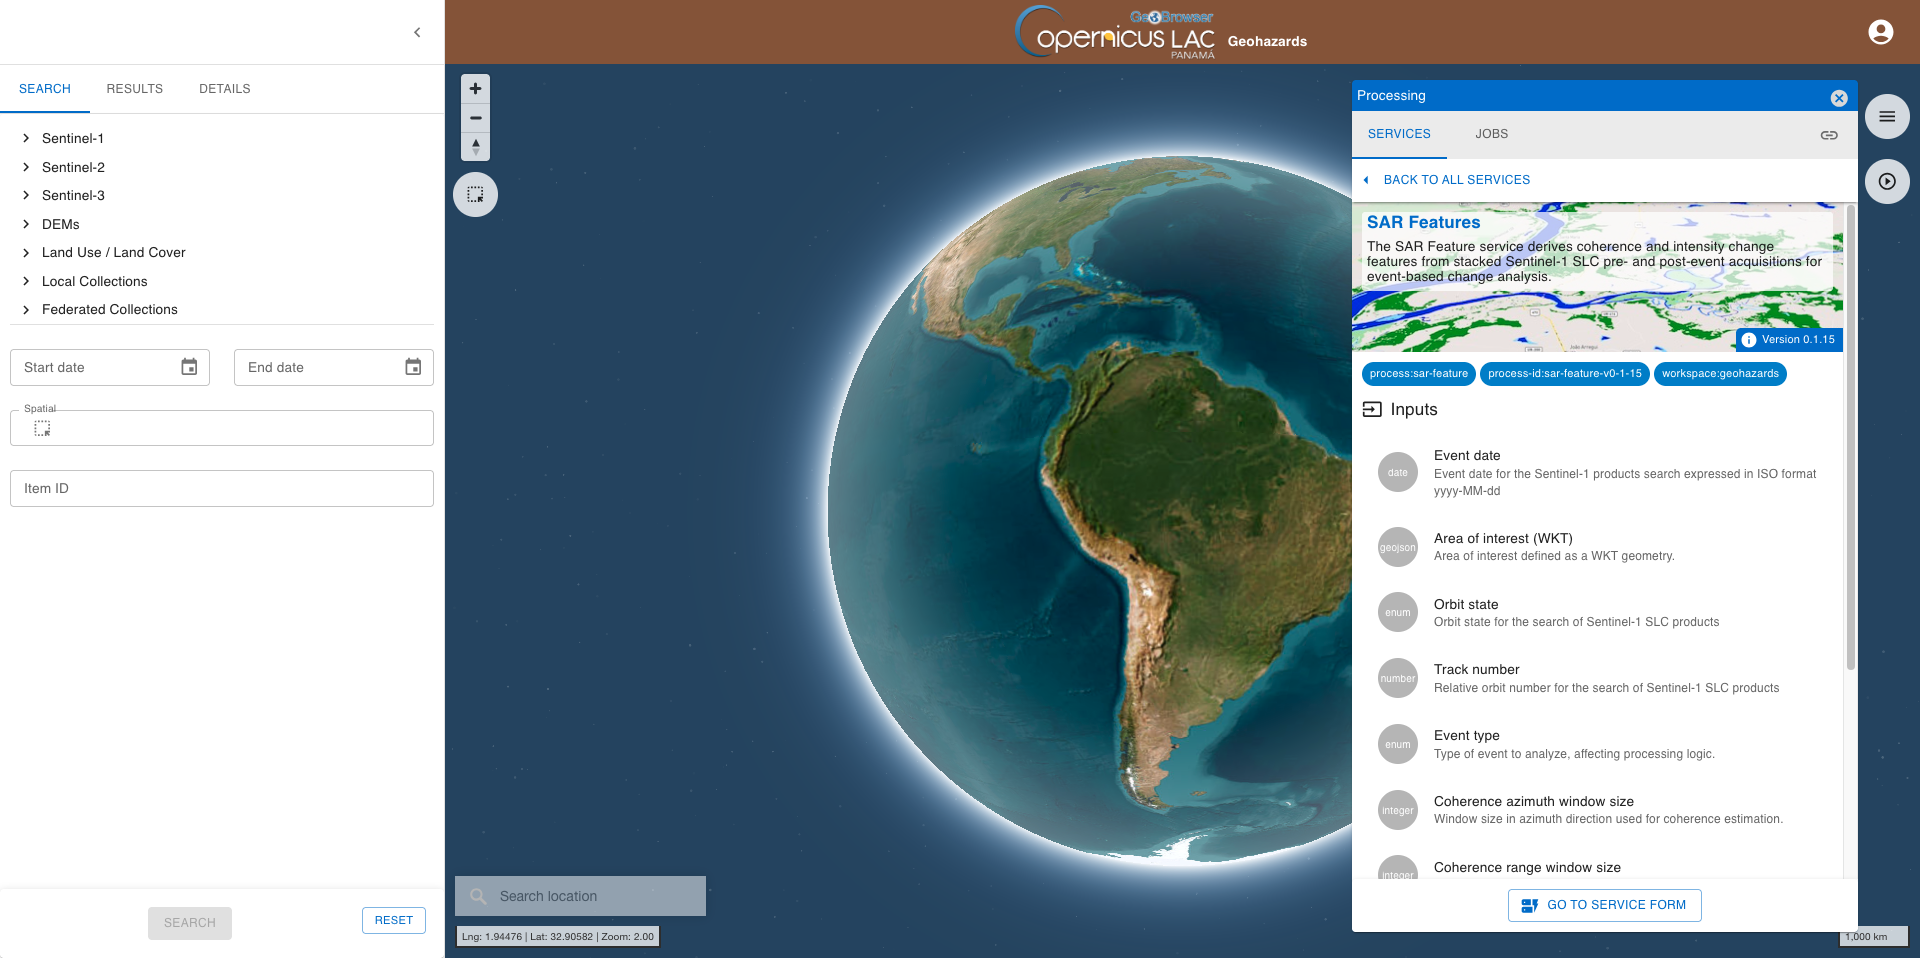
This tab provides a quick description of the service. In the upper part of the tab are shown:
-
service full name,
-
service caption,
-
hyperlink to the online documentation
-
version of the service.
Below that are listed all mandatory and optional parameters that the user must define when submitting the on-demand processing. Each parameter is described with:
-
a grey circle on the left indicating the format of input value required for the parameter. As an example if the parameter is a string (e.g. catalog reference) or a number (e.g. a threshold),
-
the identifier of the parameter,
-
a brief description of the parameter.
Hint
To fix the processing panel on the right side of the GUI click on the Attach panel icon, available in the upper right corner of the panel.
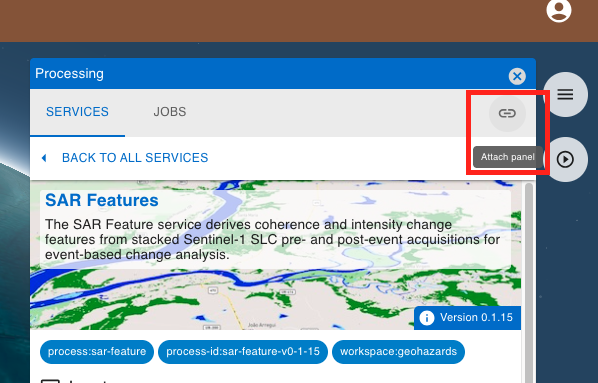
At the bottom of the tab is located the GO TO SERVICE FORM button. Click on it to move to the next tab where the user can fill-in all service parameters and submit the on-demand job.
Search for Sentinel-1 available imagery using spatial and temporal filters
Select the area for which you want to do an analysis, as an example near Valencia, Spain. In this tutorial the SAR Features service is used to assess the impact over urban and bare soil of the October 2024 flood event.
Navigate to the area
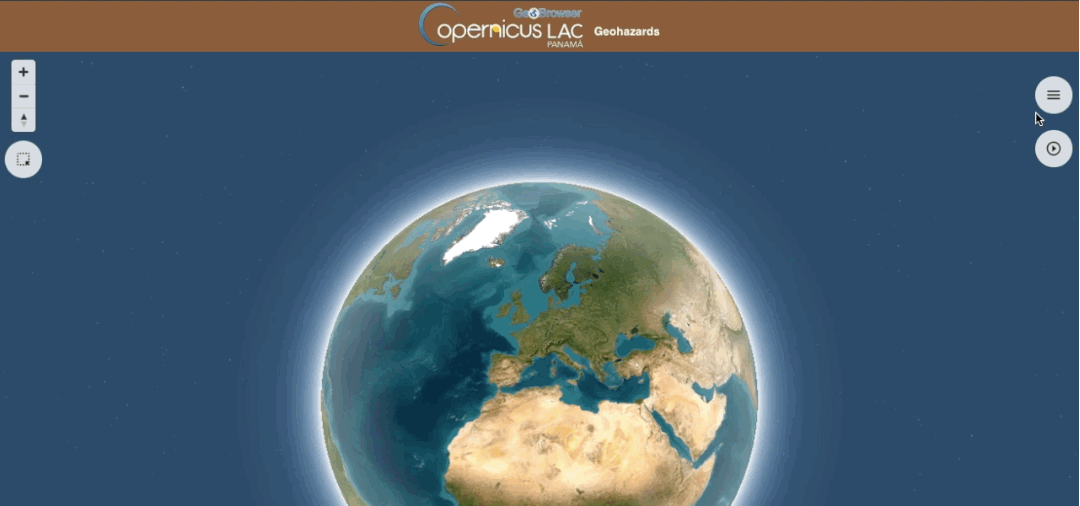
To find this area navigate in the map from the global view using the dedicated buttons located in the top left of the map or using the mouse.
Hint
Navigation controls are located on the top right of the map. From these buttons the user can:
-
Zoom in: left click on the button
-
Zoom out: left click on the button
-
Change the viewing angle by setting inclination and orientation: left click and hold the compass button while you drag left and right or up and down.
-
Reset bearing to the north: left click on the compass button
In the 3D view the user can tilt the map in any direction. The 3D tilt control is useful to view hills and mountains.
Note
Same navigation commands can also be done using the mouse.
-
Zooming and panning can be done using the mouse wheel,
-
Changing the viewing angle (inclination and orientation) can be done by holding
Ctrl + Left Clickon the map to start changing the bearing and pitch. While holding theCtrl + Left Clickand moving the cursor the 3D view of the map will start rotating.
If needed, you can change from the Basemap Control panel the baselayer to better find your area of interest.
Hint
The Basemap Control panel is hidden by default and is accessible by clicking on the button located on the top right of the map.
From this panel the user can change the default background map ESRI World Map with another one by clicking on the desired base layer from the list:
-
Streets
-
Outdoors
-
Satellite Streets
-
Satellite
-
Dark
-
Light
From the Basemap control panel it is also possible to switch from the 3D to a plane view of the map by clicking on the dedicated button located just below the list of base layers. By default the 3D view is selected.
In the Basemap Control panel select the Satellite Streets base layer showing boundaries and places drawn on top of satellite imagery.
Spatial filter
Employ a spatial filter by drawing an Area of Interest (AOI) on the map over the area of Valencia using the :material-select-arrow-up: button located in the upper left part of the map.
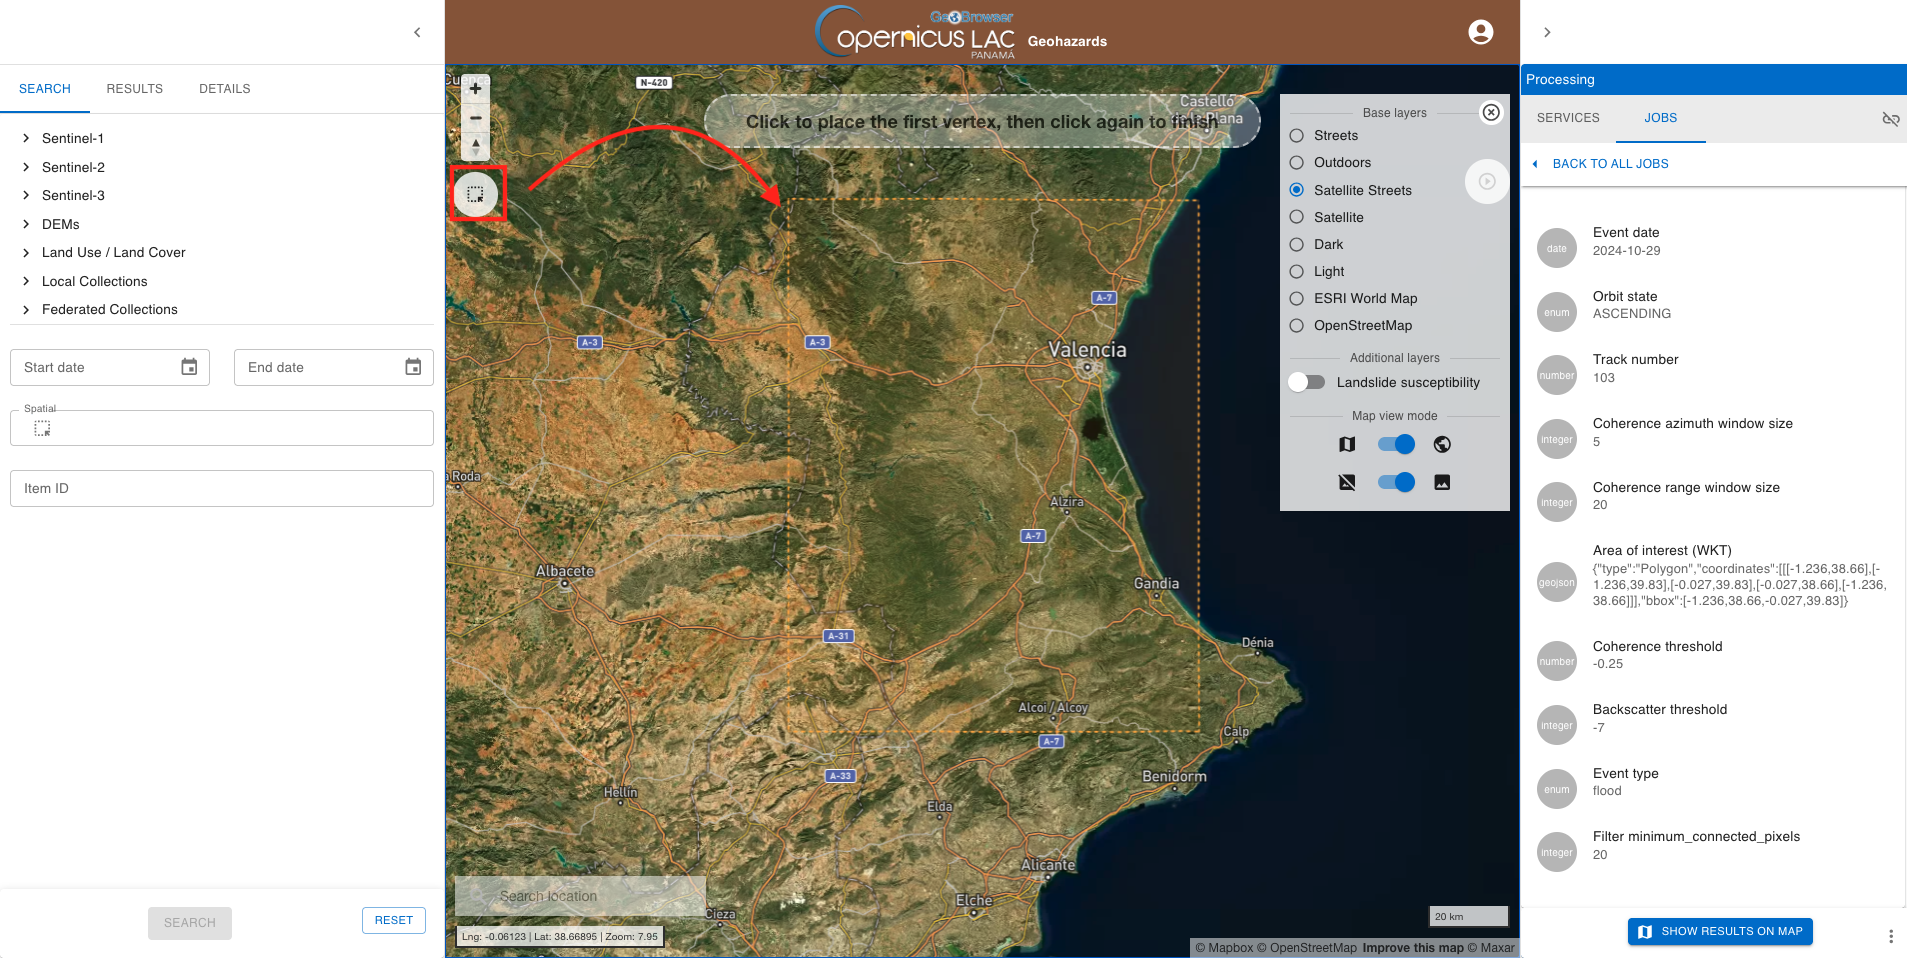
Once in place the spatial filter is in place a green polygon will be available on the map. Click on Search by AOI to employ this drawn geometry as spatial filter in the left panel.

After that the BBox field available in the Search tab of the left panel is automatically filled-in with its BBOX geometry in WKT format.
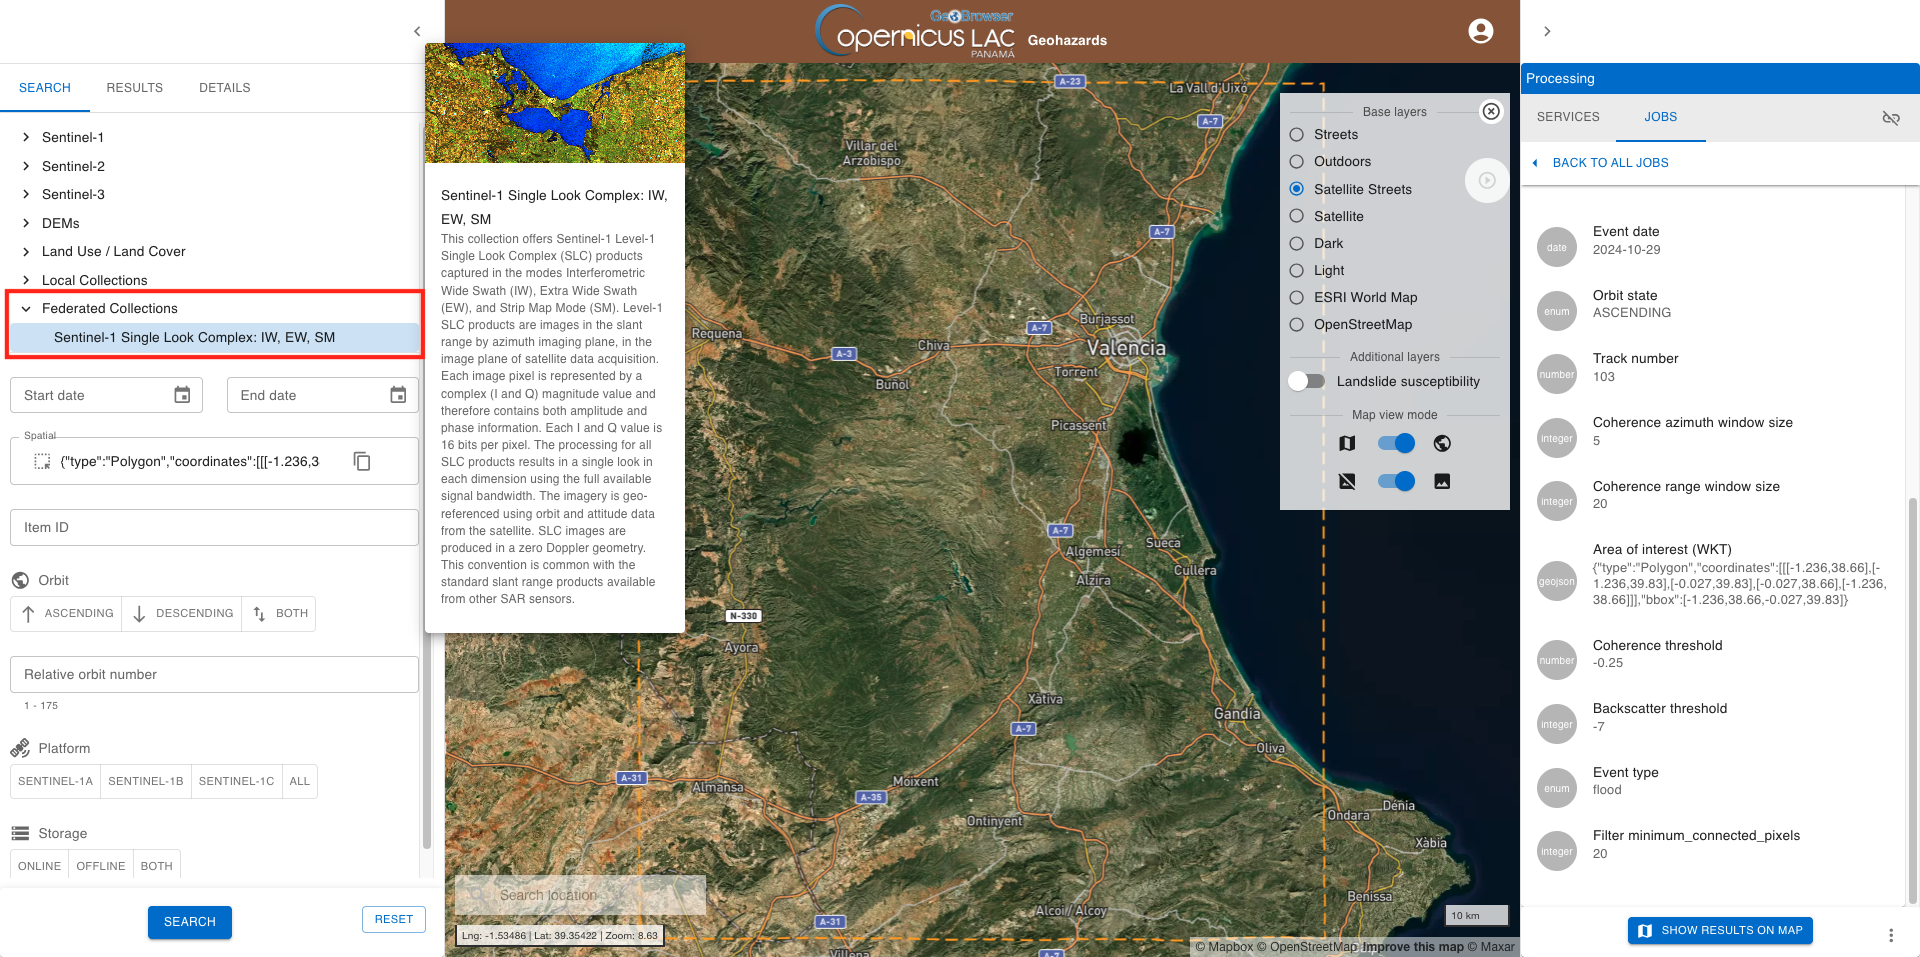
Select the collection
Before employing a search from the left panel you need to select a collection from the list available in the left panel. From the Search tab of the left panel select Sentinel-1 Single Look Complex: IW, EW, SM available under Federated collections.
Warning
You can select only one collection from the list.
Search and find results
Once the spatial filter is in place you can employ the search by clicking on the SEARCH button located at the bottom of the Search tab of the left panel.
Warning
You cannot employ a search without selecting a collection from the list.
After that the left panel will automatically switch to the Search tab showing the result of your serach.
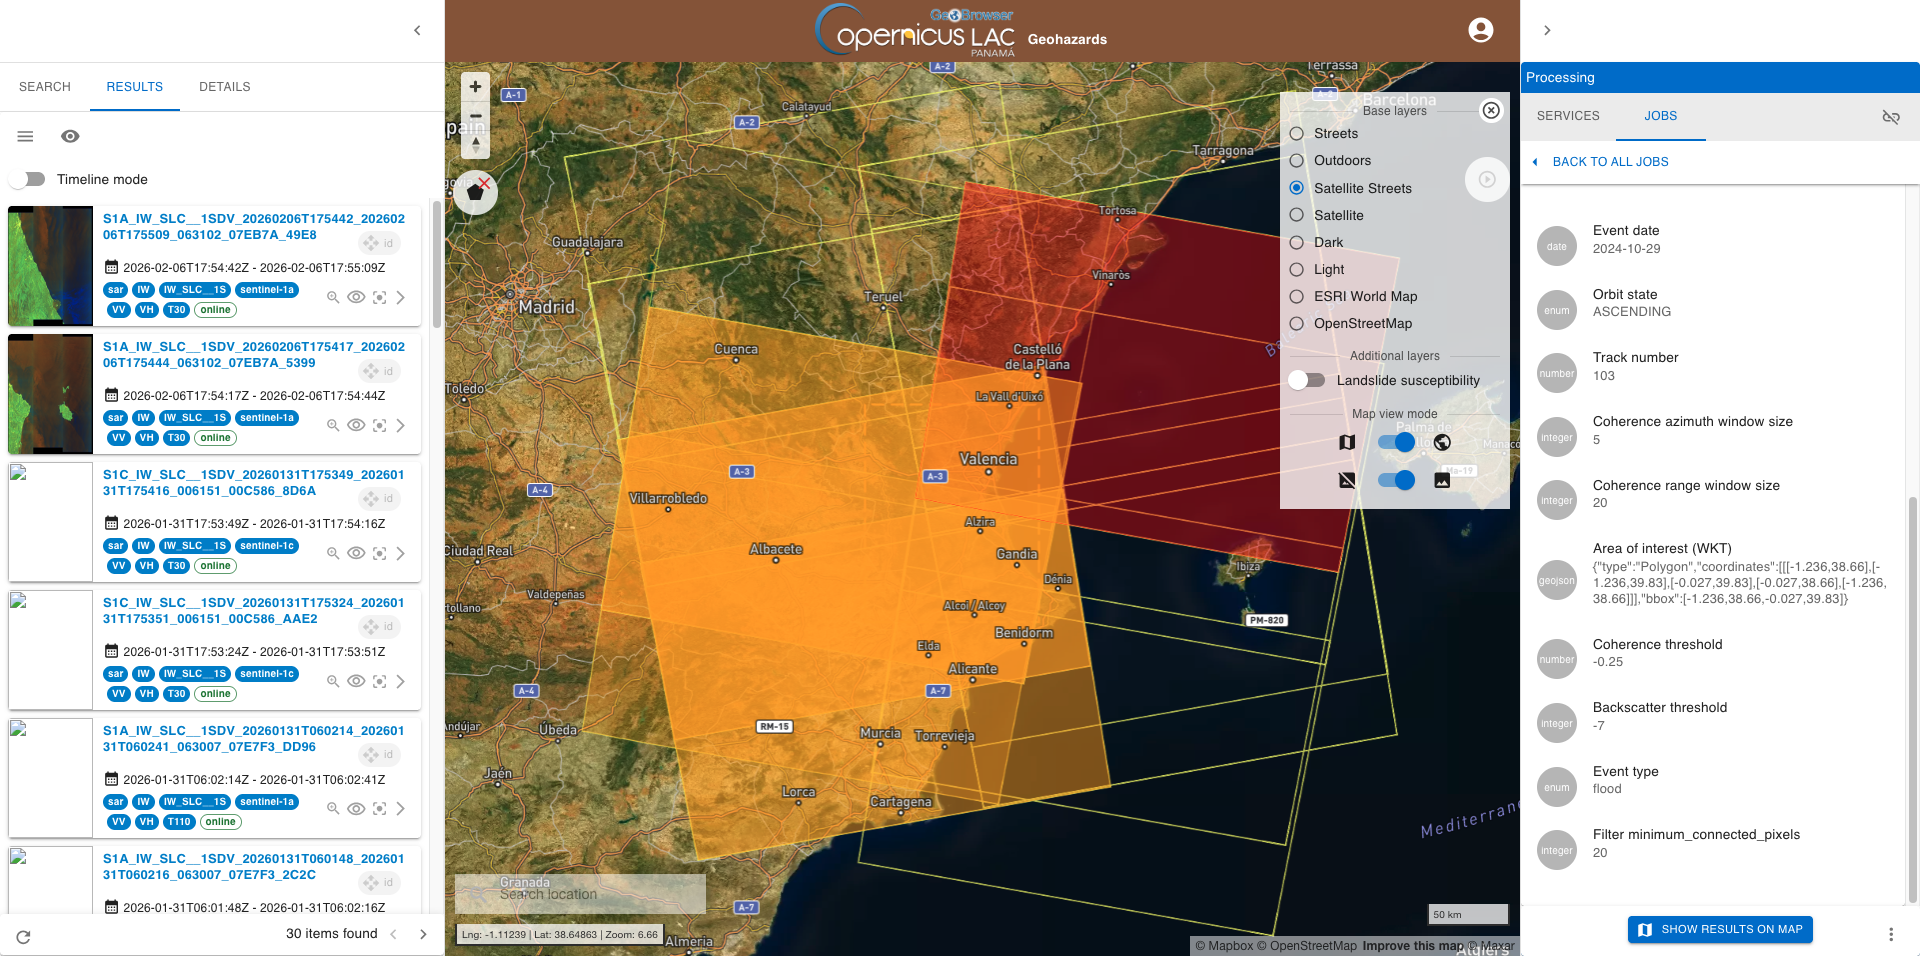
In this case the search made for the Sentinel-1 Single Look Complex: IW, EW, SM collections is returning all the features acquired over Valencia since the beginning of Sentinel-1 mission.
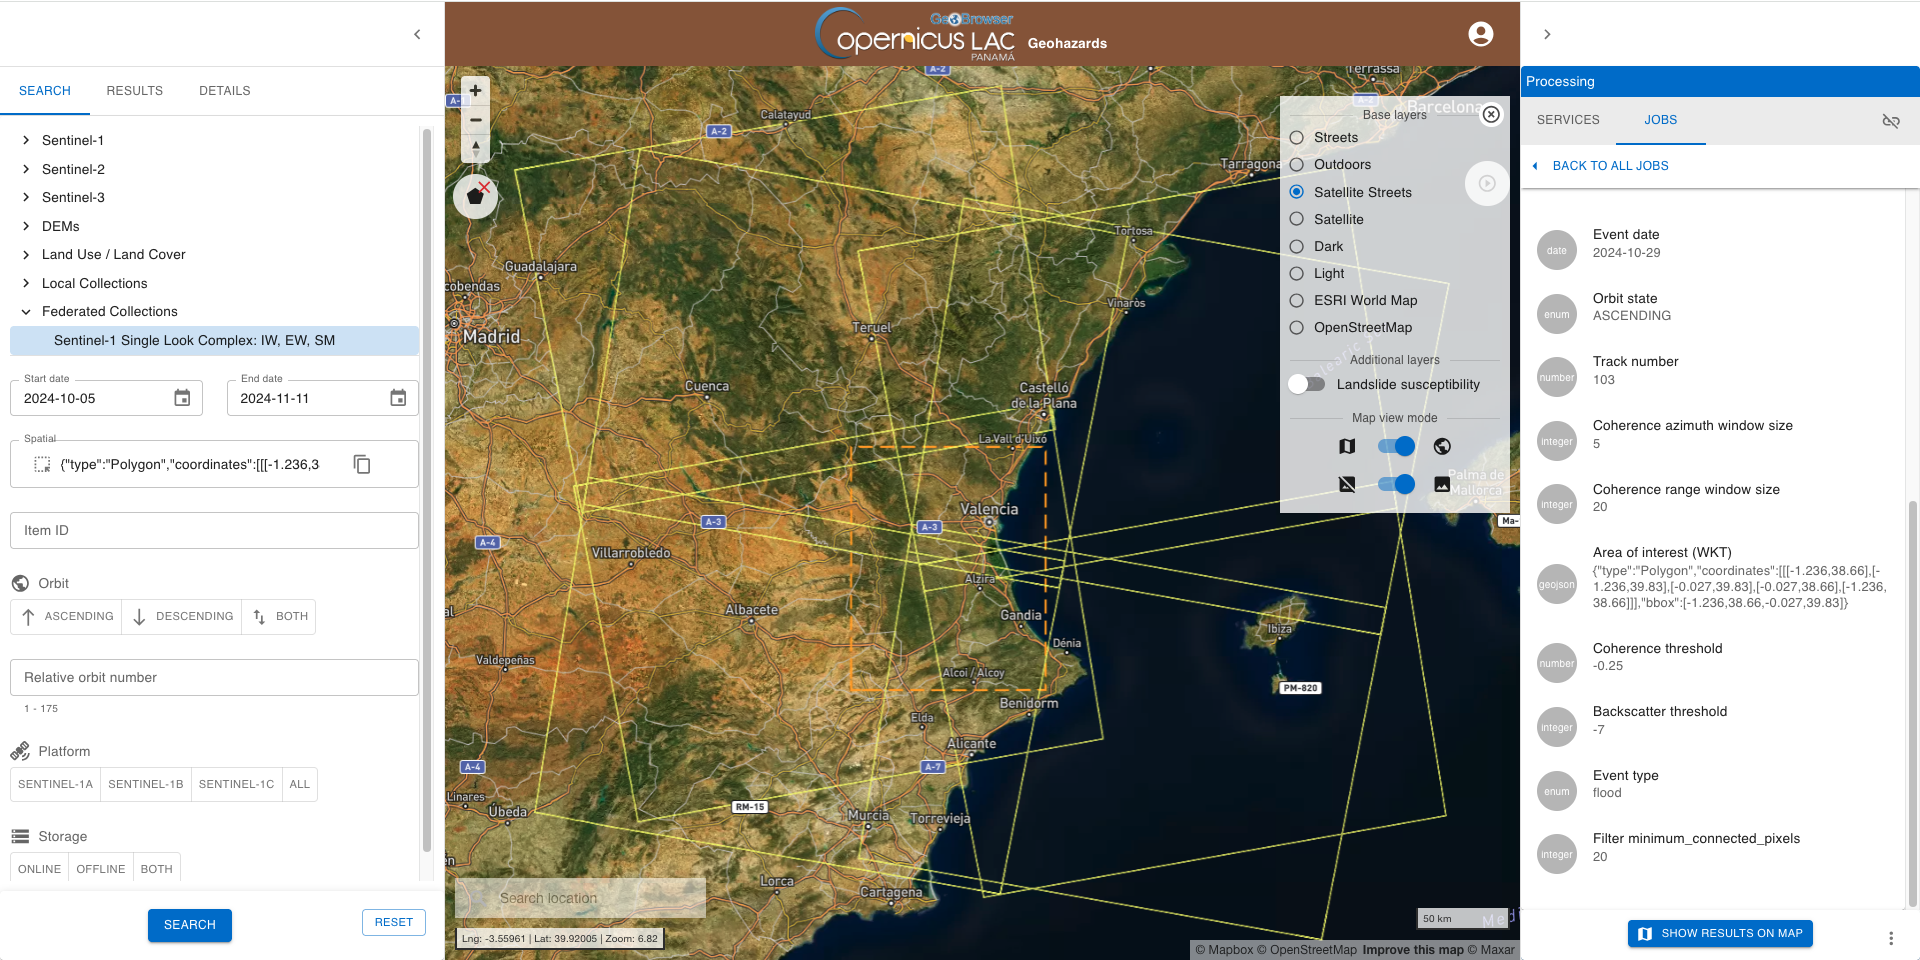
Refine search by applying a temporal filter
To refine the previous search you can also define a temporal filter. From the RESULTS tab in the left panel go back to the SEARCH one. Now from the upper part of the left panel you can insert a Start date and an End datefrom the Search tab of the left panel.
In this use case the date of the event is 2024-10-29, thus using the date picker insert 2024-10-05 as start date and 2024-11-11 as end date.
Once the temporal filter is in place you can employ again the search by clicking on the SEARCH button located at the bottom of the Search tab of the left panel.
Hint
To remove a temporal filter in place click on RESET button.
Further detail the search by applying other filter options
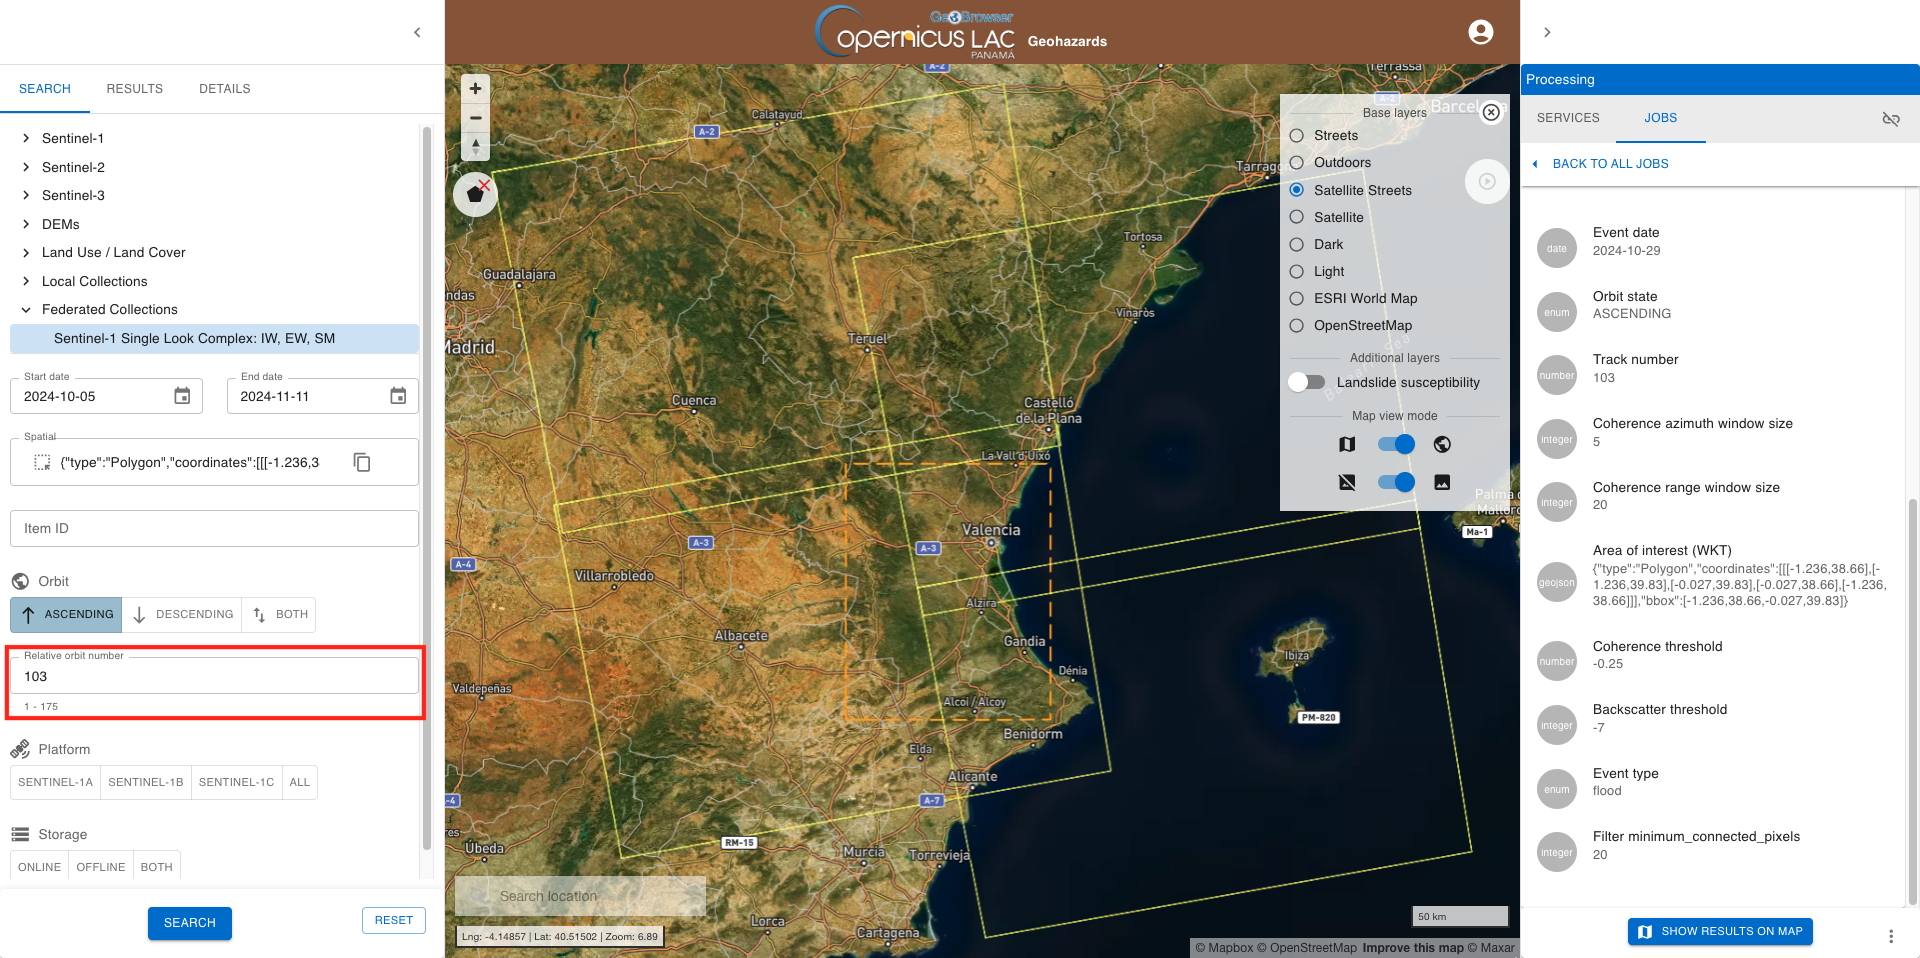
To further detail the search you can also select the Sentinel-1 orbit state and track number. From the RESULTS tab in the left panel go back to the SEARCH one. Now from left panel under Orbit specify ASCENDING and then click on the SEARCH button.

After the search is in place from the RESULTS tab select one of products (click on the image footprint in the map) and identify the realtive orbit of interest from the ones intersecting the AOI. For instance in this case the relative orbit 103.
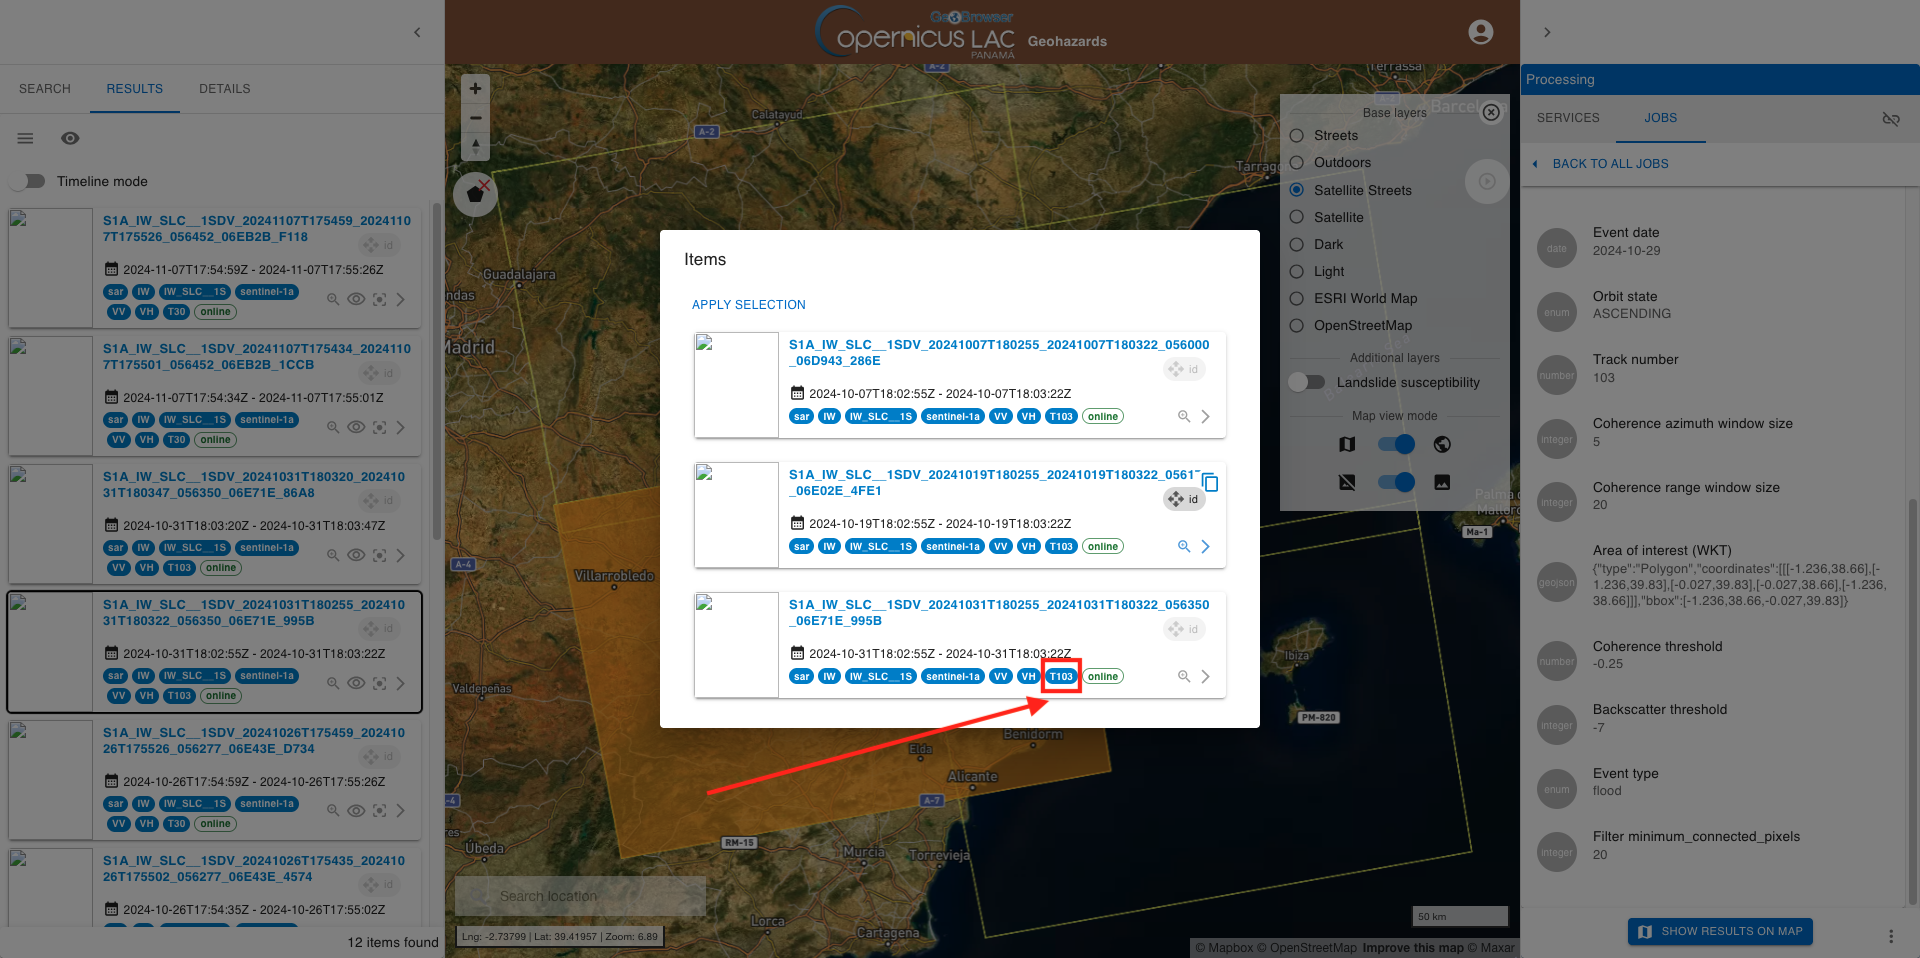
From the RESULTS tab in the left panel go back to the SEARCH one. Now from left panel under Orbit, Relative orbit number insert 103 and then click again on the SEARCH button.
The result of this final search is of 6 features:
-
S1A_IW_SLC__1SDV_20241031T180320_20241031T180347_056350_06E71E_86A8
-
S1A_IW_SLC__1SDV_20241031T180255_20241031T180322_056350_06E71E_995B
-
S1A_IW_SLC__1SDV_20241019T180320_20241019T180347_056175_06E02E_45CE
-
S1A_IW_SLC__1SDV_20241019T180255_20241019T180322_056175_06E02E_4FE1
-
S1A_IW_SLC__1SDV_20241007T180320_20241007T180347_056000_06D943_867F
-
S1A_IW_SLC__1SDV_20241007T180255_20241007T180322_056000_06D943_286E
that are 2 consecutive slices along the ascending orbit T103 acquired over Valencia on 7 Oct 2024, 19 Oct 2024 (before the event) and on 31 Oct 2024 (after the event).
After this search the key information to note down are:
{
  "event_date": "2024-10-29",
  "orbit_direction": "ASCENDING",
  "track_number": "103",
  "aoi": "POLYGON((-1.236 38.66,-1.236 39.83,-0.027 39.83,-0.027 38.66,-1.236 38.66))"
}
Fill the parameters
To start the SAR Features service, you need to define input parameters. Access the SAR Features service form.
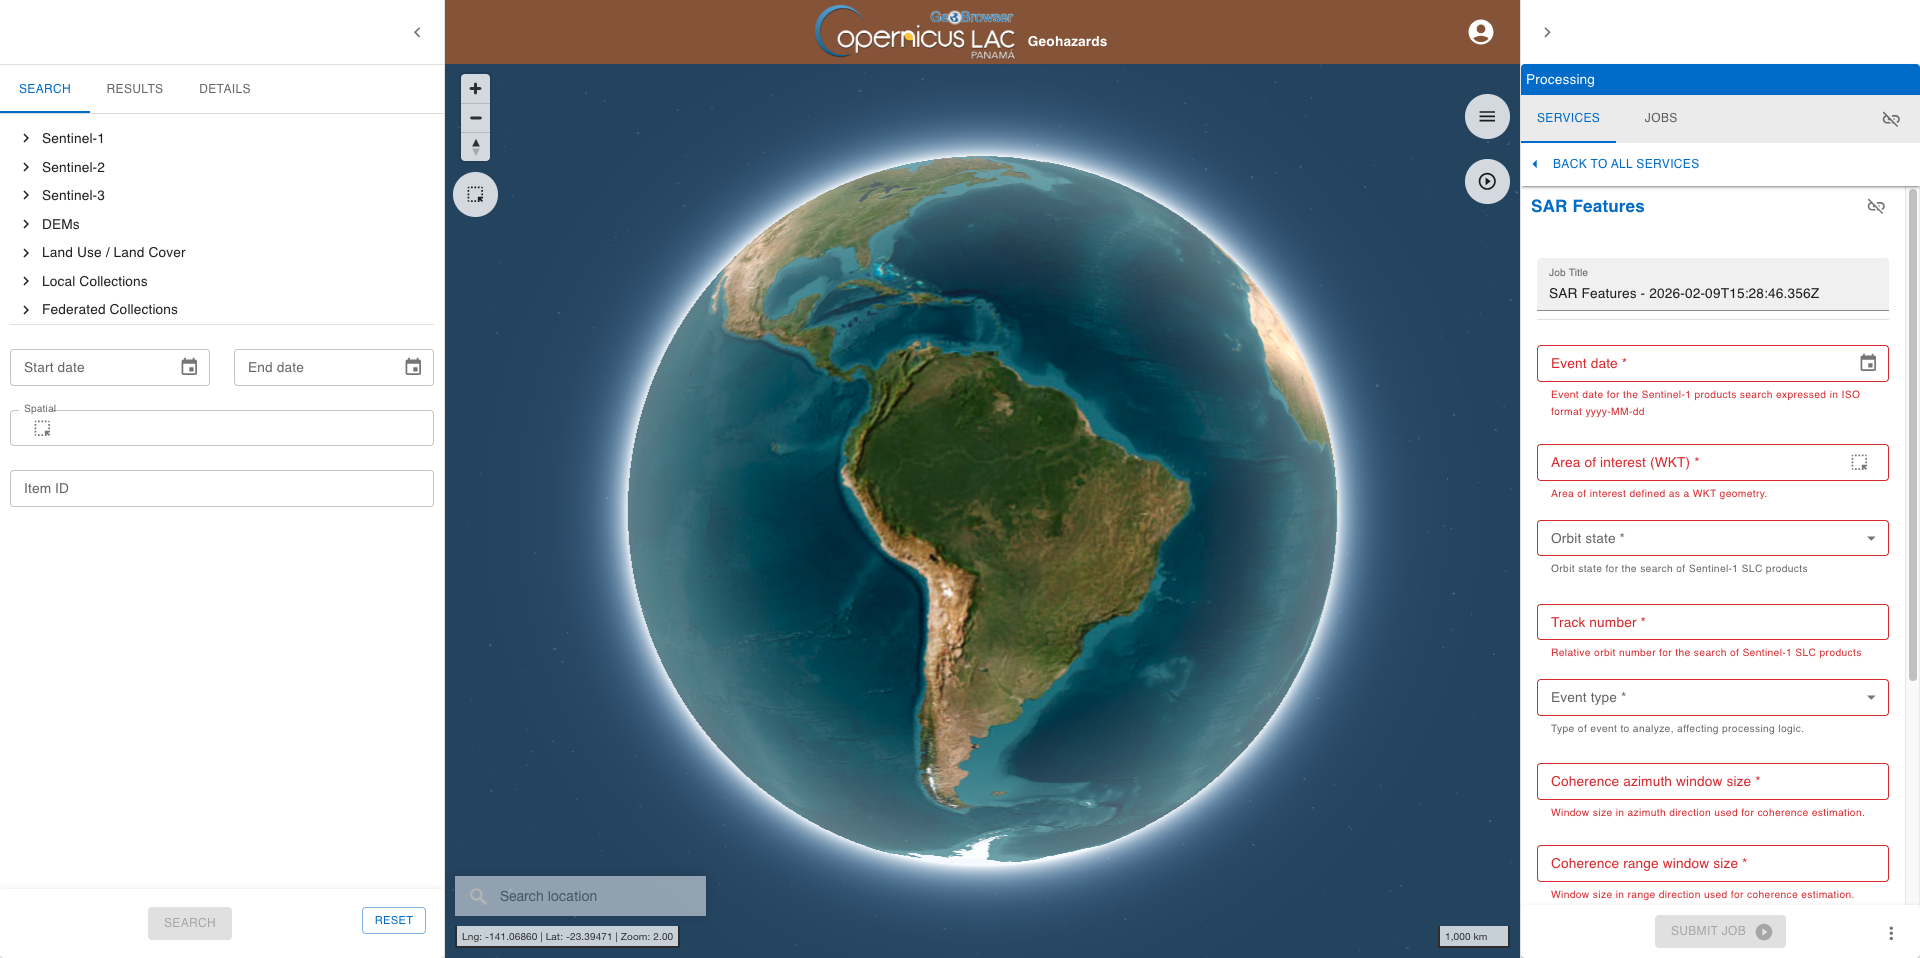
In red are highlighted the mandatory parameters to be filled in.
Hint
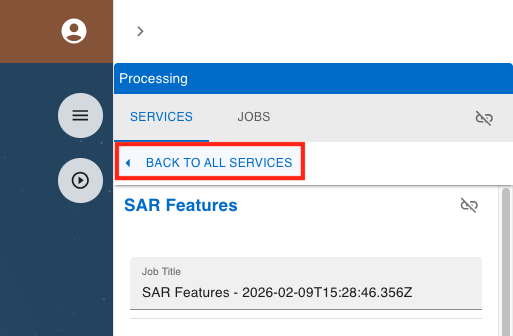
To go back to the service panel click on the BACK TO ALL SERVICES button.
Hint
In case you can't find anymore the SAR Features service form:
-
open the Processing panel by clicking on the button on the top right of the map,
-
find the SAR Features service from the list of services,
-
click on the button next to it,
-
and then click on the GO TO SERVICE FORM button.
Now fill-in the parameters as described in the following sections.
Job Title
First of all you can assign a name to the on-demand job you are launching. A predefined title is generated by the platform. Modify this title and assign the title you prefer. For instance, insert as Job title:
SAR Features - Valencia ASC 103 2024-10-29
Note
If you don’t specify a name, the system automatically assigns one using the service name and the date and time of job creation SAR Features - YYYY-MM-DDThh ssZ
ssZ
Event Date
In this parameter you shall insert the date when the flood event occurred. Use the date picker widget provided next to the parameter box on the left to insert the event date as 2024-10-29.
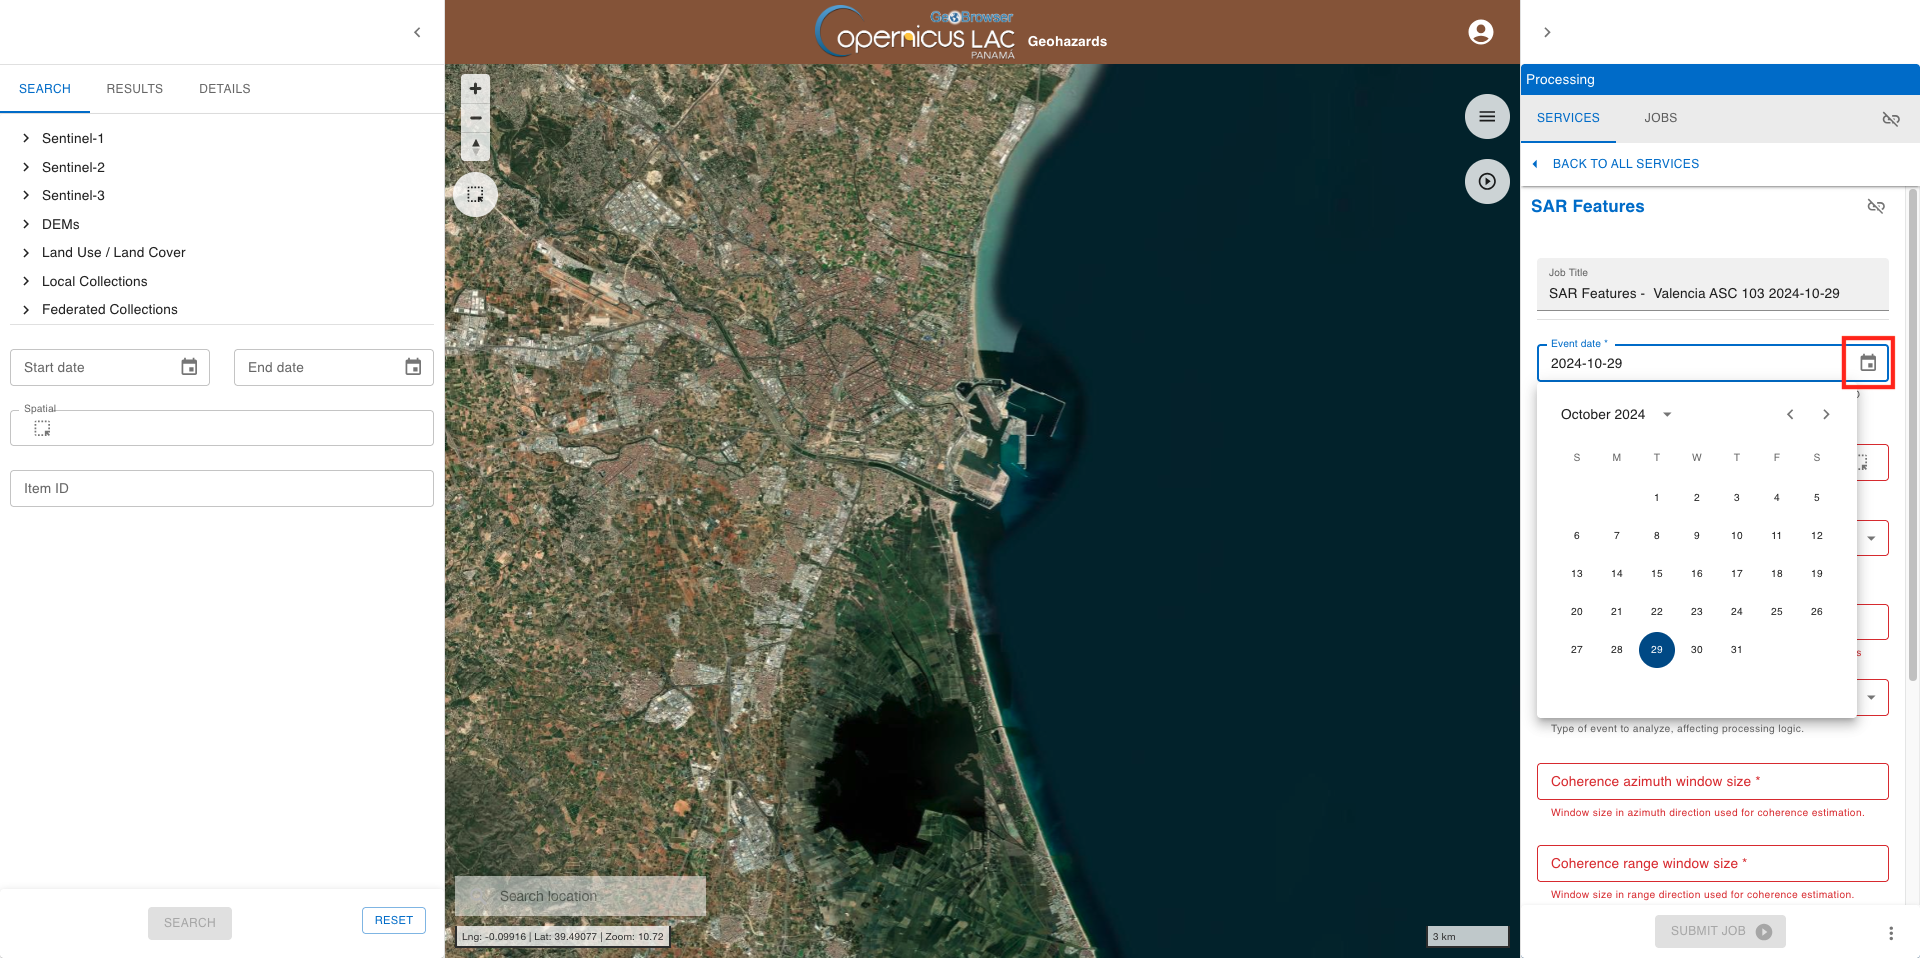
After that the date parameter will be automatically filled-in with a date string in the format YYYY-MM-DD. The service will use this date to search for pre- and post-event S1 acquisitions as done earlier.
Warning
It is always suggested to use the date picker widget to fill-in the parameter. If manually isnerted, the date must be specified in the form YYYY-MM-DD. Do not insert for instance 29-10-2024 or 2024/10/29 but 2024-10-29.
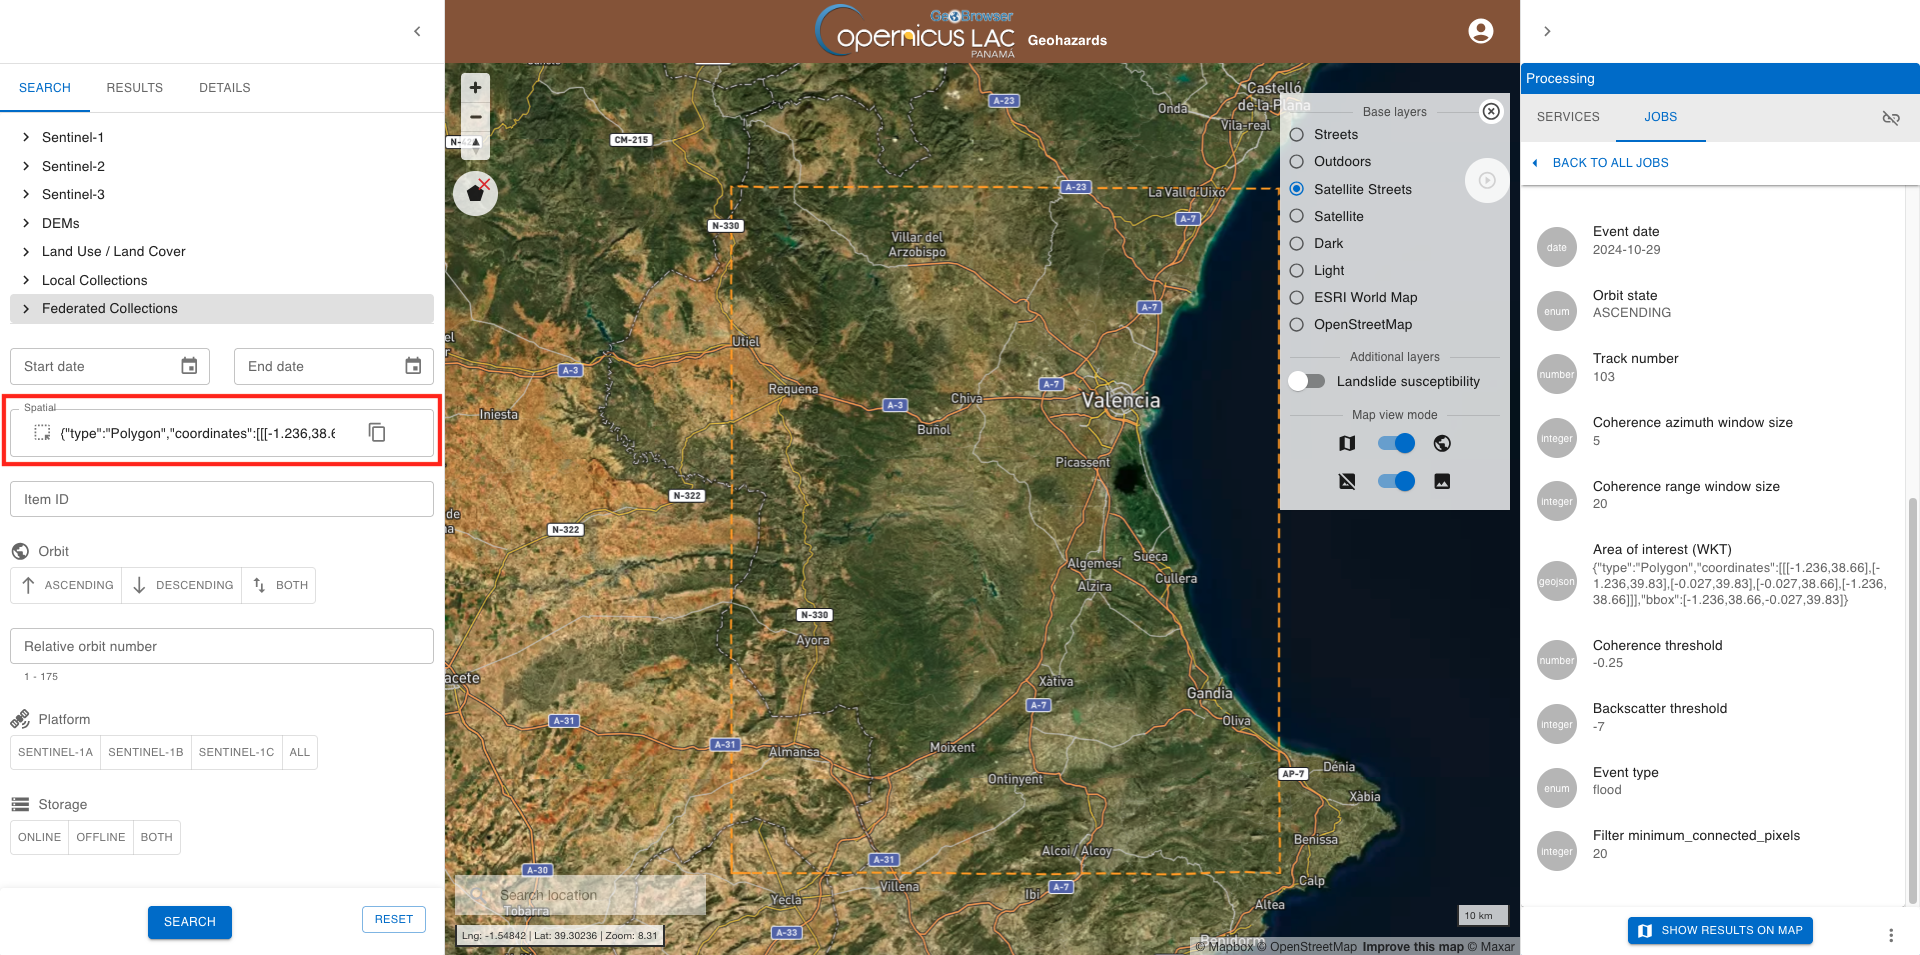
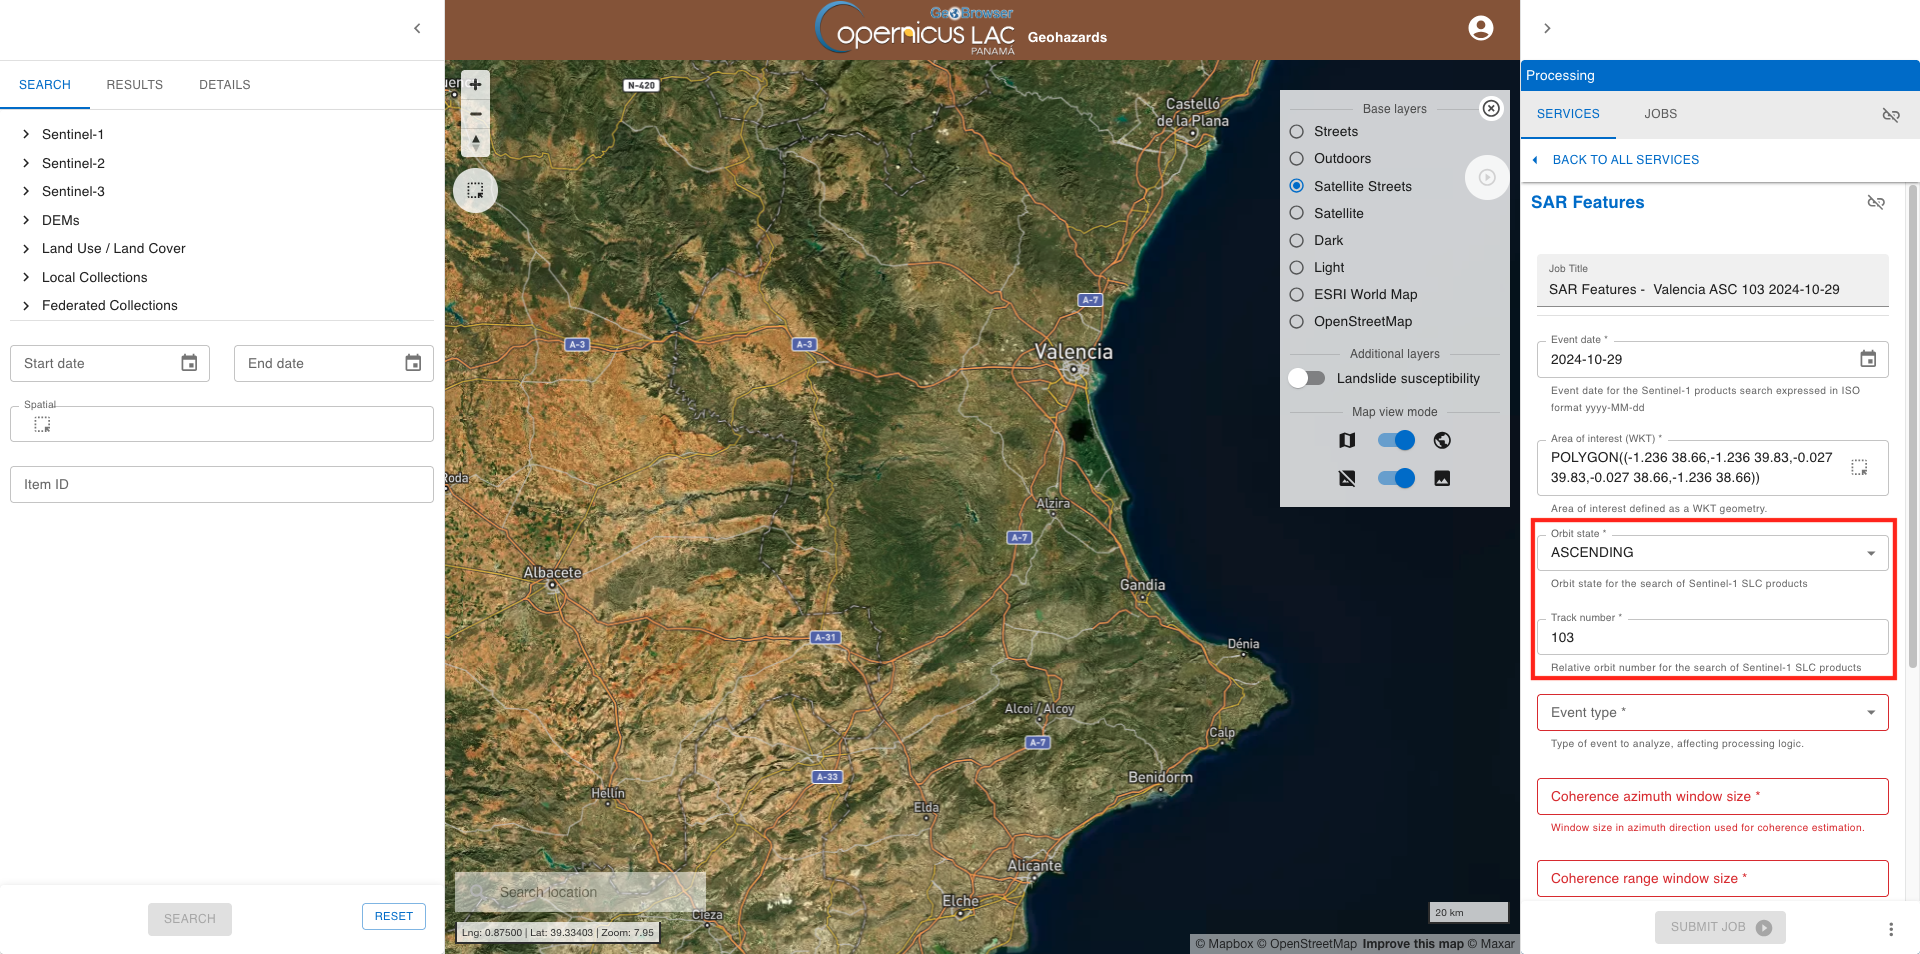
Area of interest
The third mandatory parameter allows you to specify the geographic area where the flood event took place, and thus will be the area where the flood extent map will be produced by the service. The AOI can be specified using the dedicated filter by the BBOX widget provided next to the parameter box on the left.

After that the coordinates of your polygon will automatically appear in the Spatial field on the Search panel on the left.
POLYGON((-1.236 38.66,-1.236 39.83,-0.027 39.83,-0.027 38.66,-1.236 38.66))
Hint
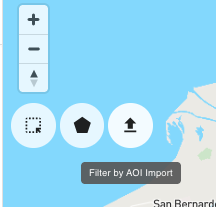
Do you already have a geometry as WKT string or a GeoJSON file and you want to employ it as AOI in your job? There is the option to import your AOI by clicking on Filter by AOI import button located in the upper left corner of the map under the navigation toolbar.
After that paste your WKT value in the dedicated field and click on IMPORT AOI button
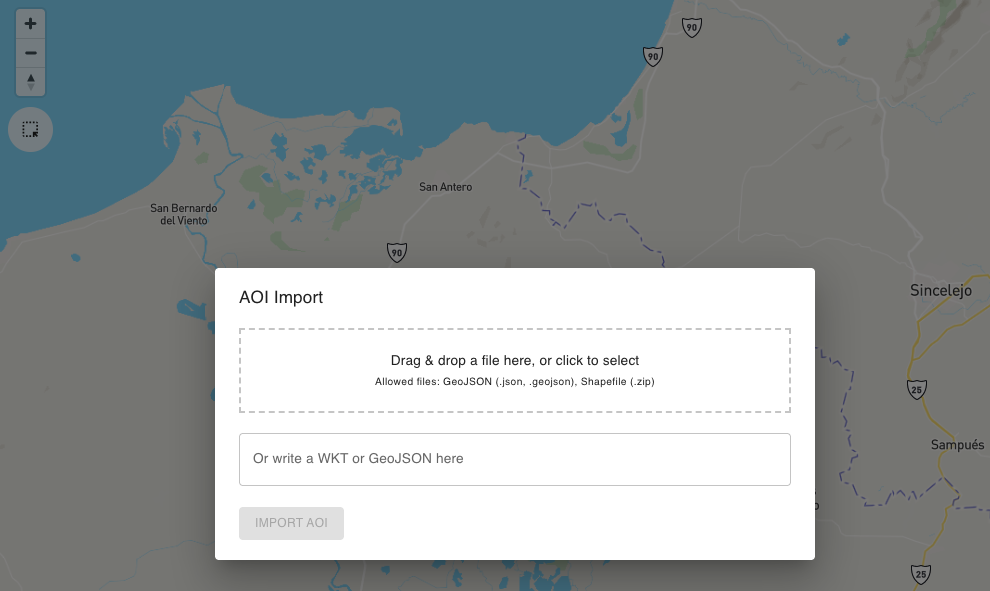
After that the coordinates of your polygon will automatically appear in the Spatial field on the Search panel on the left.
At this point you can now copy the WKT coordinates from the Spatial field by clicking on the Copy to clipboard icon and then on the Copy WKT option.
Finally, you can paste the value into the Area of interest field in the SAR-FEM service form. After the paste you will get a WKT string.
Orbit state and track number
Based on the search done earlier, from the Orbit state parameter select the ASCENDING option from the list and in the Track number parameter insert 103.
Event type
From the Event type parameter select the flood option from the list.
Azimuth and range window size for coherence estimation
In the Coherence azimuth window size parameter insert 5 and in the Coherence range window size parameter insert 20.
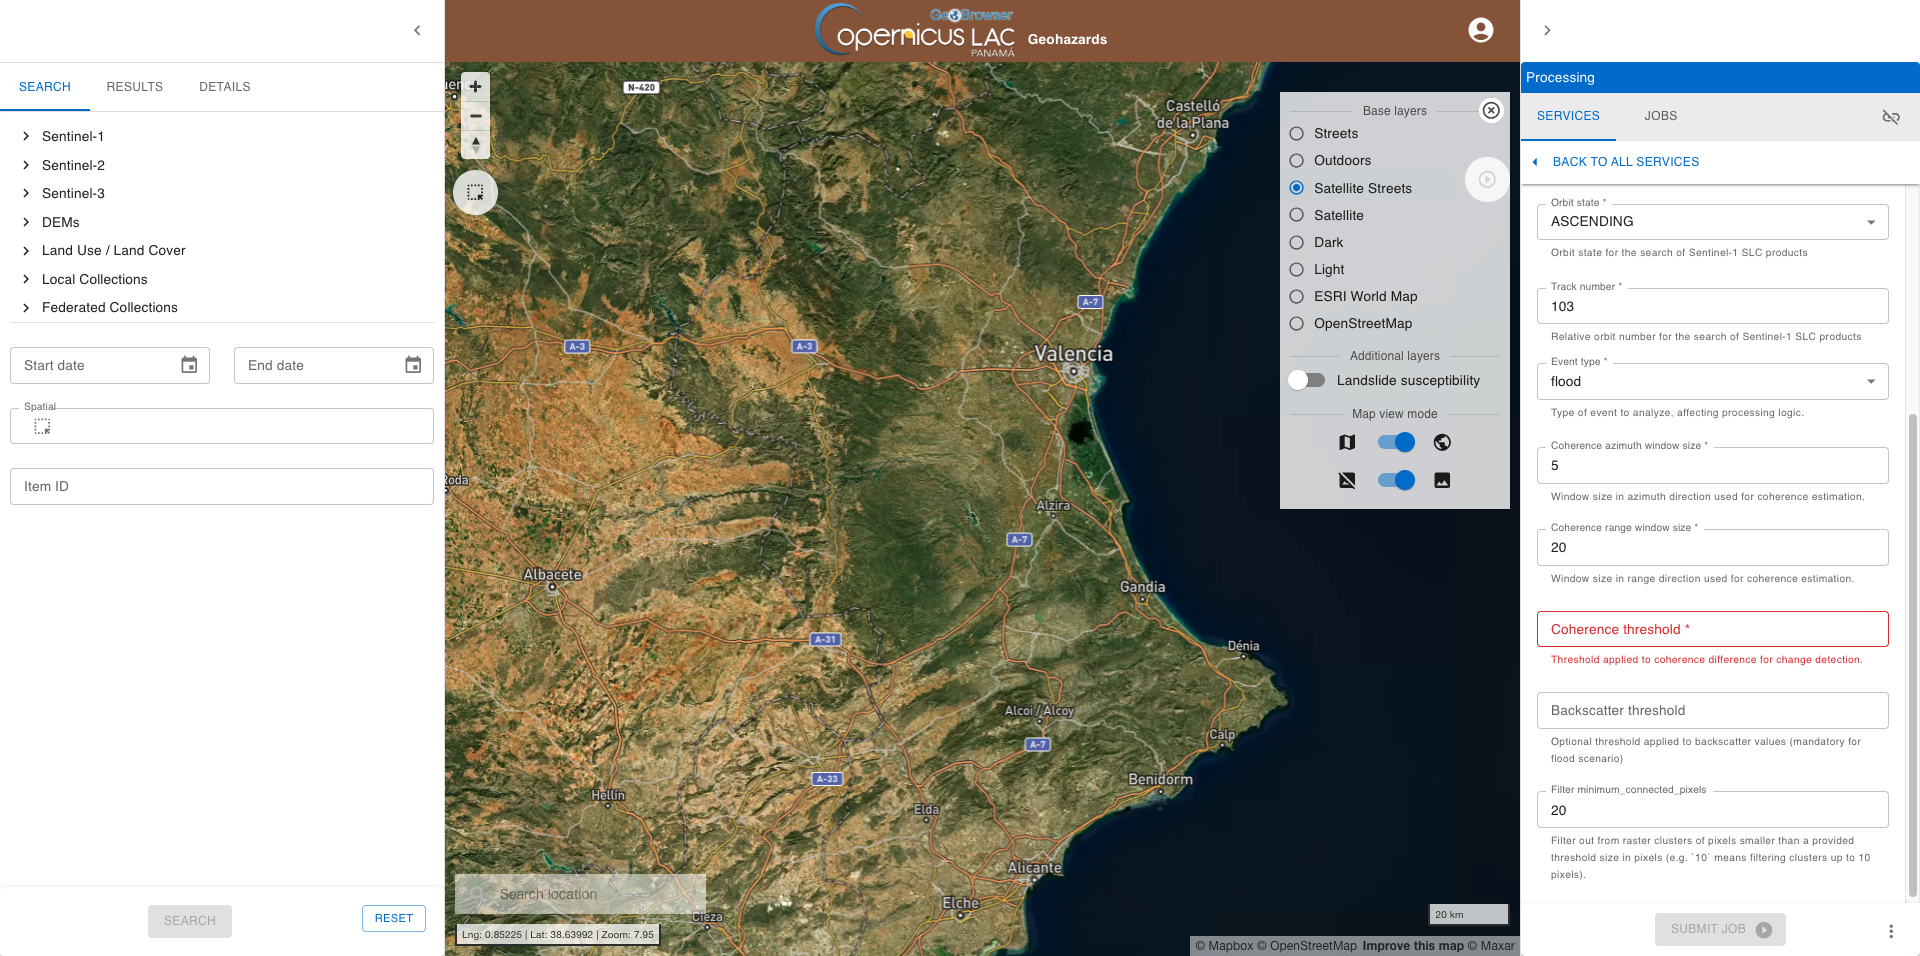
Coherence and backscatter thresholds
In the Coherence threshold parameter insert -0.3 which is the default value suggested in the SAR features specifications for the Flood scenario. Similarly, in the Backscatter threshold parameter insert the value -7.
Filter minimum connected pixels
In the Filter minimum connected pixels parameter insert a light filtering thrteshold as 10.
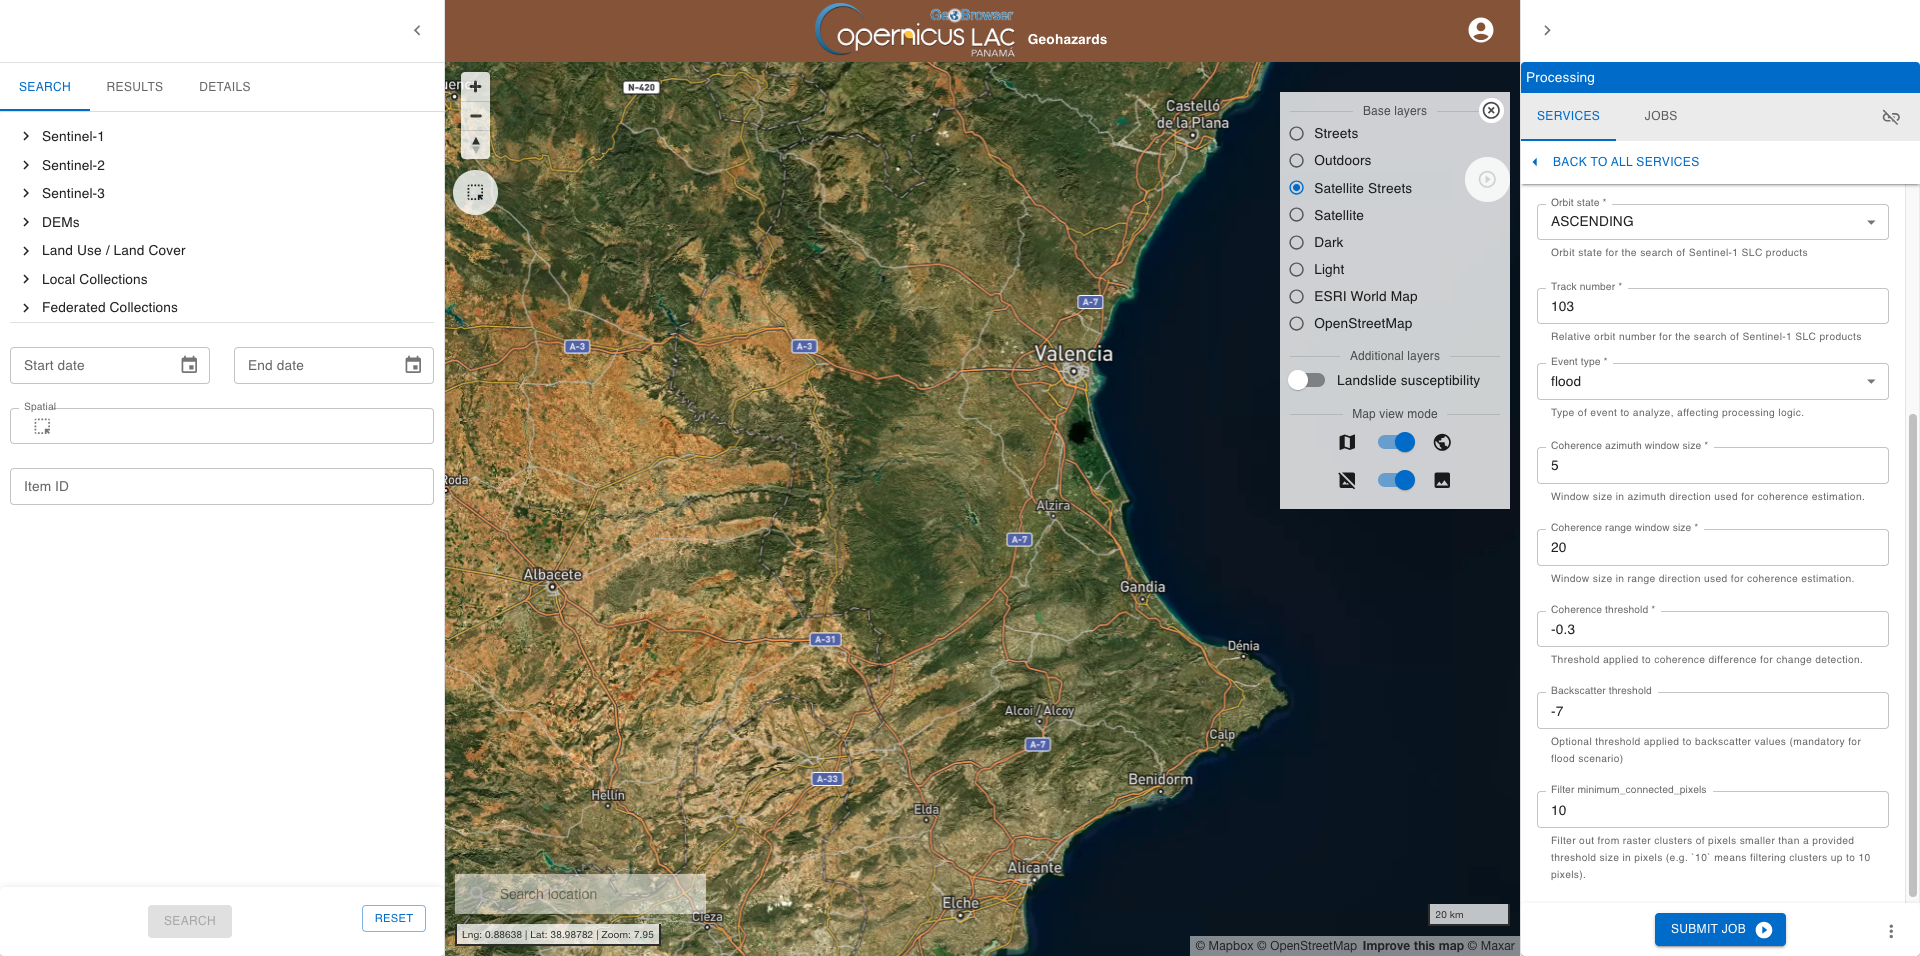
Run the job
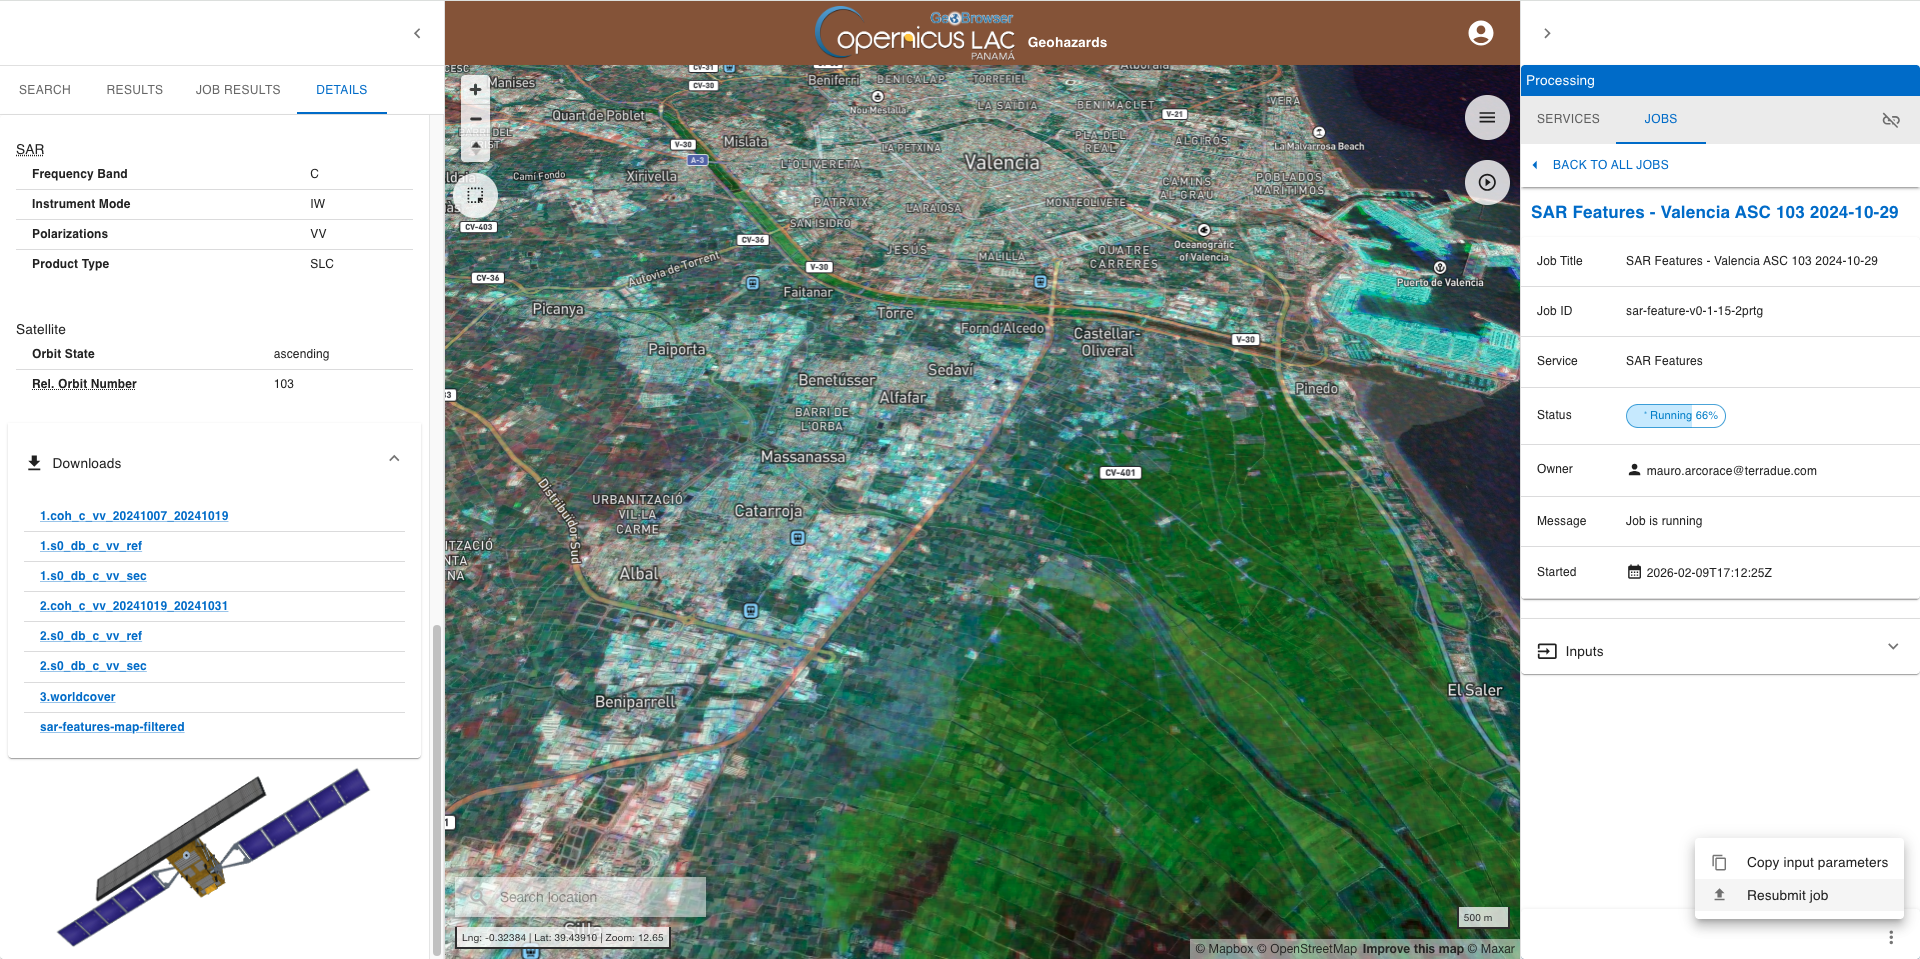
Once all parameters are filled-in click on the button Submit Job button and see the Running Job.
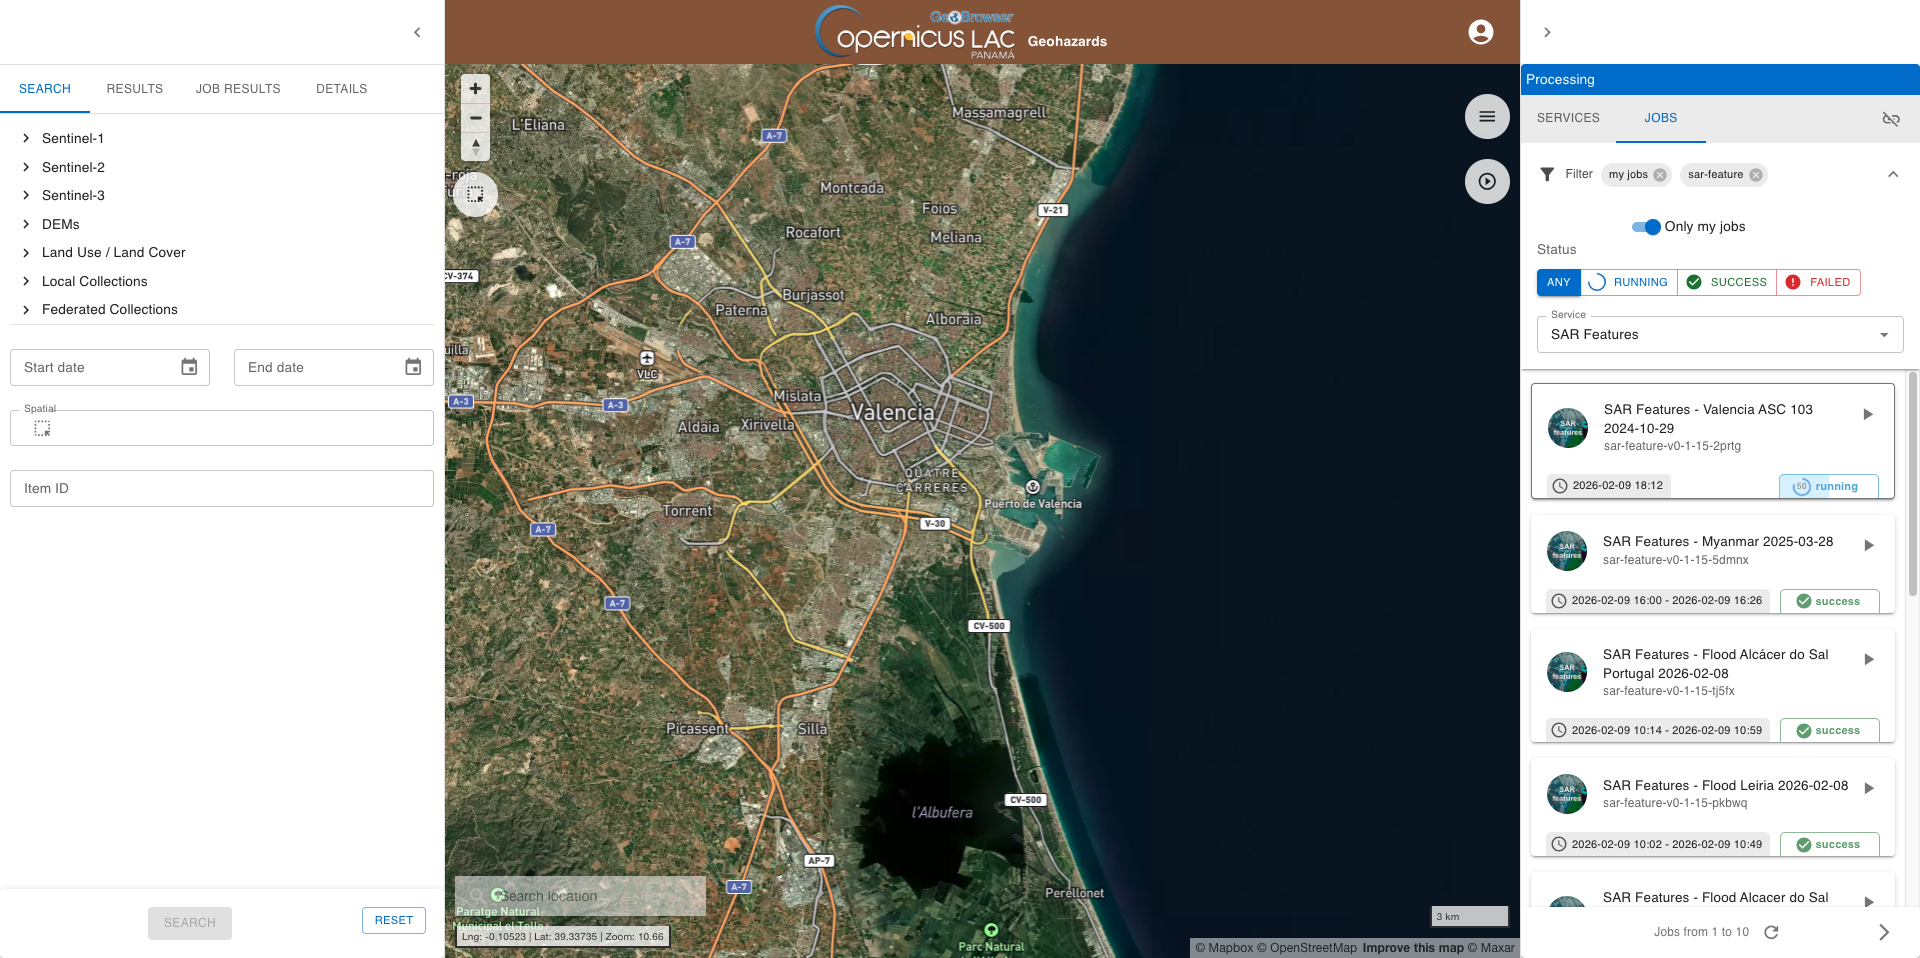
From the right panel under the JOBS tab you can filter the list of jobs using multiple criteria:
-
Show only my jobs,
-
Service,
-
Status.
You can monitor the status of the job (Running, Success or Failed) progress through the List of jobs tab or the Job details one.
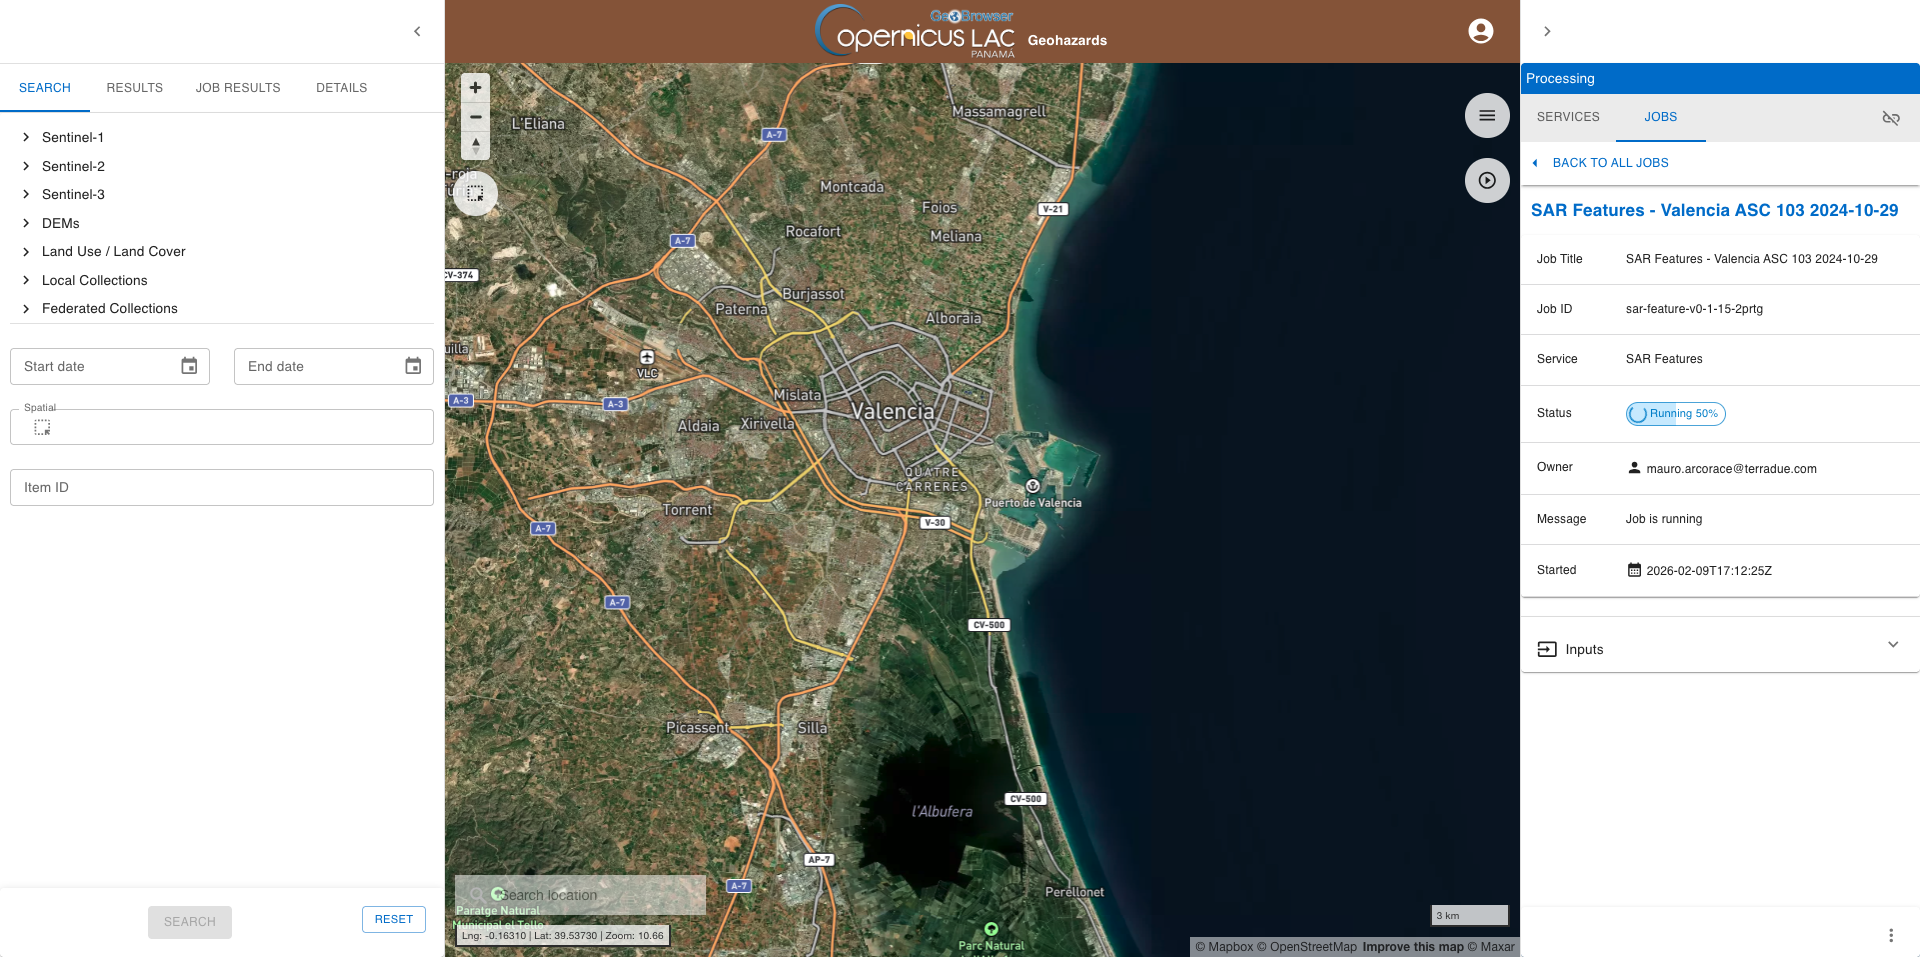
Note
Typically, the service execution is ranging from a few minutes to a few hours depending on the extent of the user’s AOI, the observation time period, and the allocation of processing resources for the job to be executed. As an example, to employ the SAR Features service over an AOI of 250000 ha with all inputs the processing time is approximately 40 minutes.
Visualize the results
Once the job is successfully accomplished, under the job details click on the button SHOW RESULTS ON MAP located in the JOBS tab of the left panel. After that the result generated by the service will be displayed on the map. In the left panel under the DETAILS tab is shown the legend together with the job metadata.
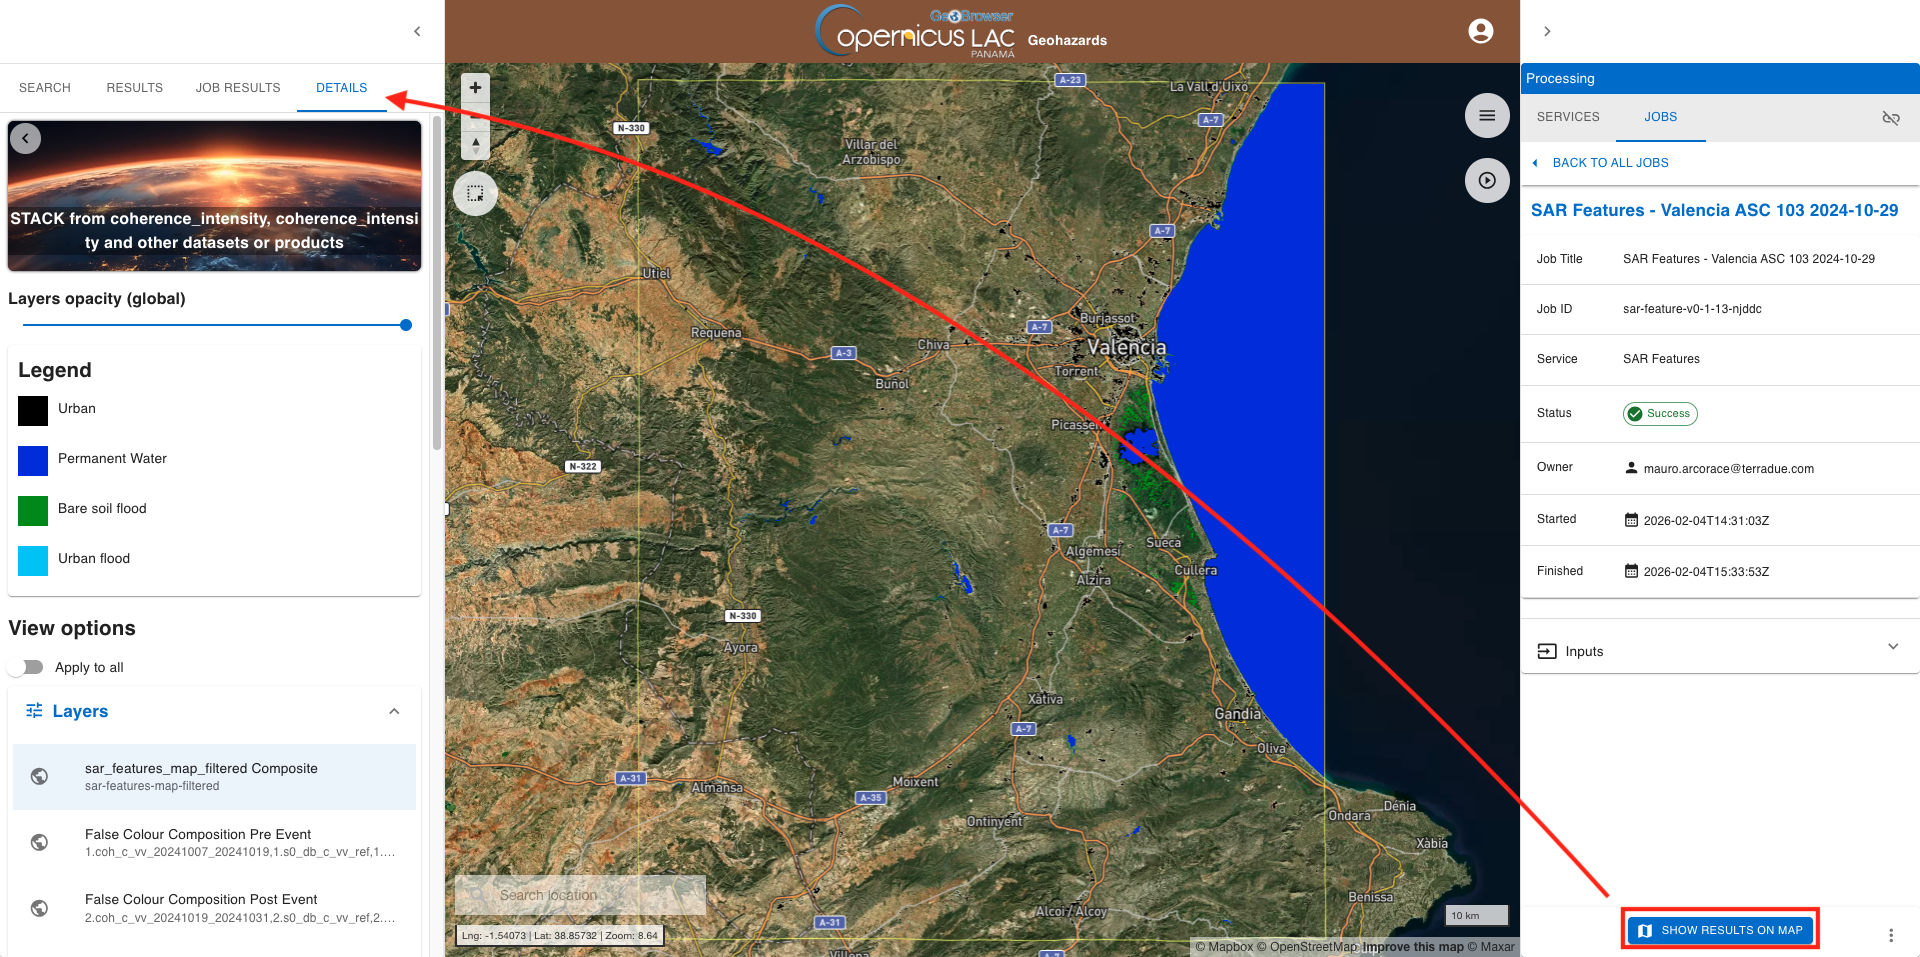
From the details of the job, accessible in the JOBS tab of the left panel, you can consult the input employed in this job. These are accessible by clicking on the Input dropdown list button.
From DETAILS tab in the left panel it is also possible to:
-
change layer selection,
-
change the opacity of the layer,
-
visualize the legend of the product,
-
and download it.
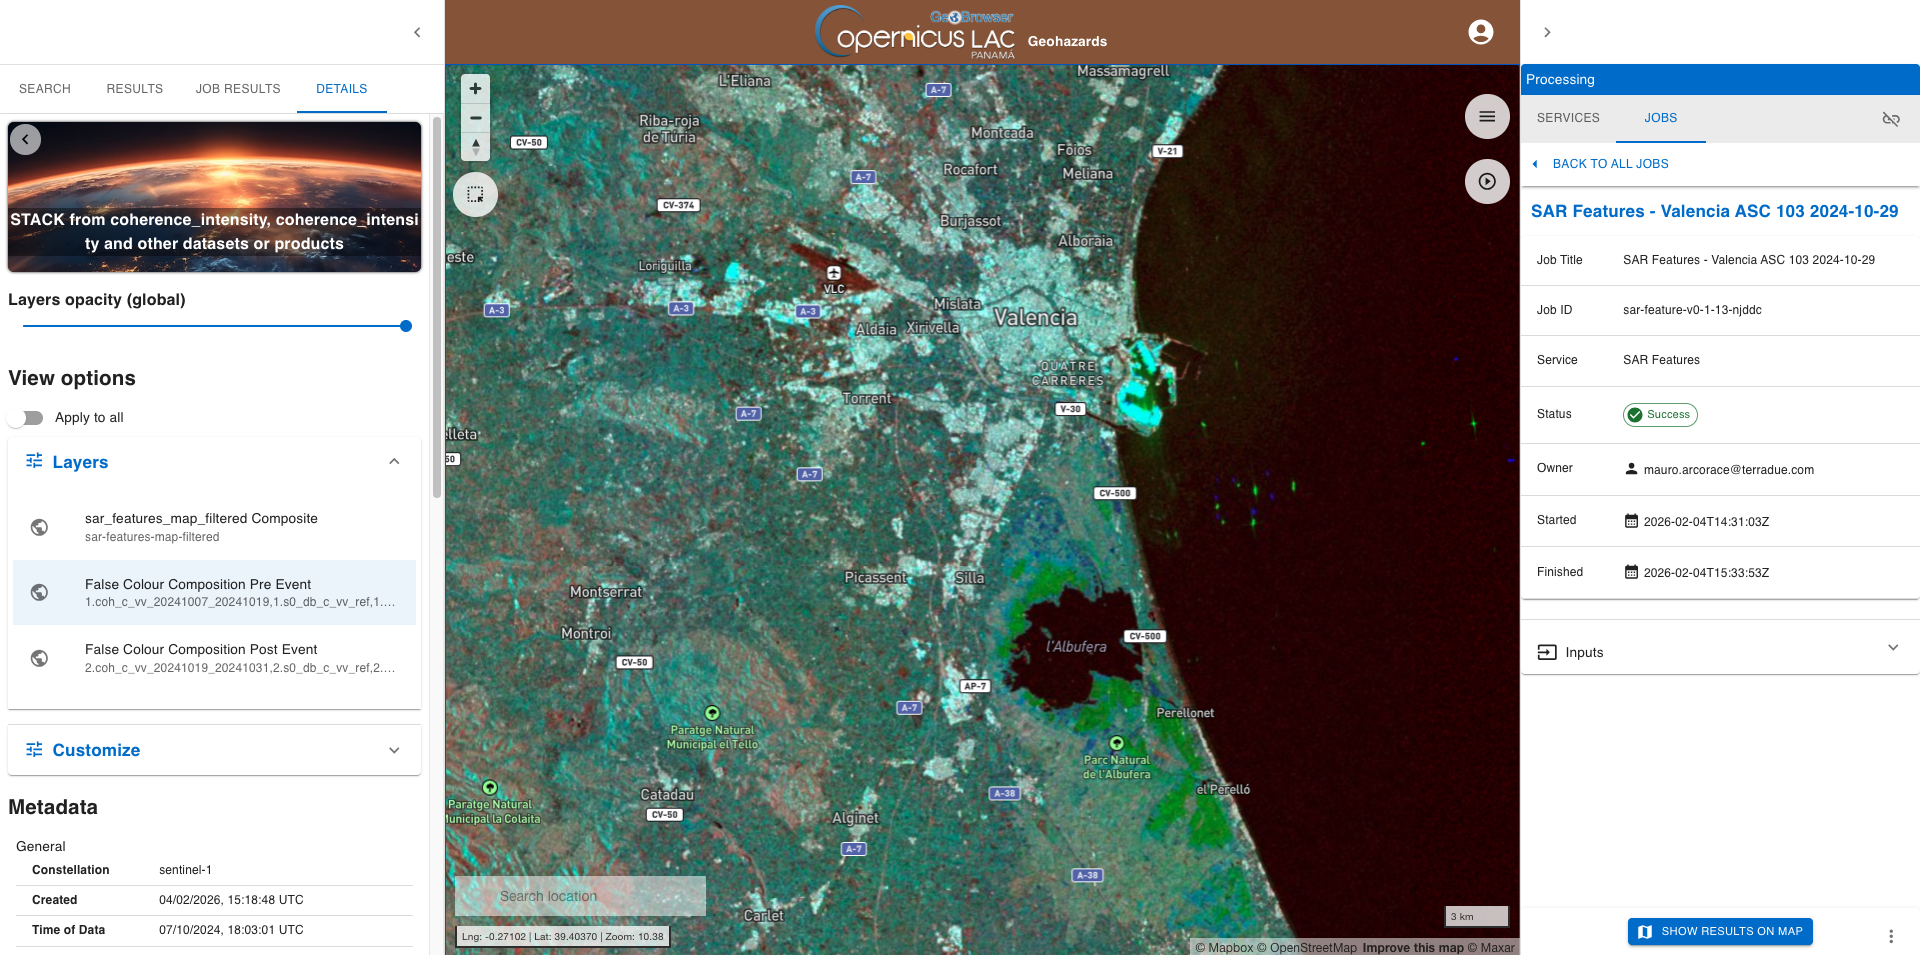
At the first access to a SAR Features job result, the first available layer sar_features_map_filtered Composite is the one selected and then shown on the map. From the left panel switch now from the current layer sar_features_map_filtered Composite to the second one in the list: False Colour Composition Pre Event. After that the other layer will be shown on the map.
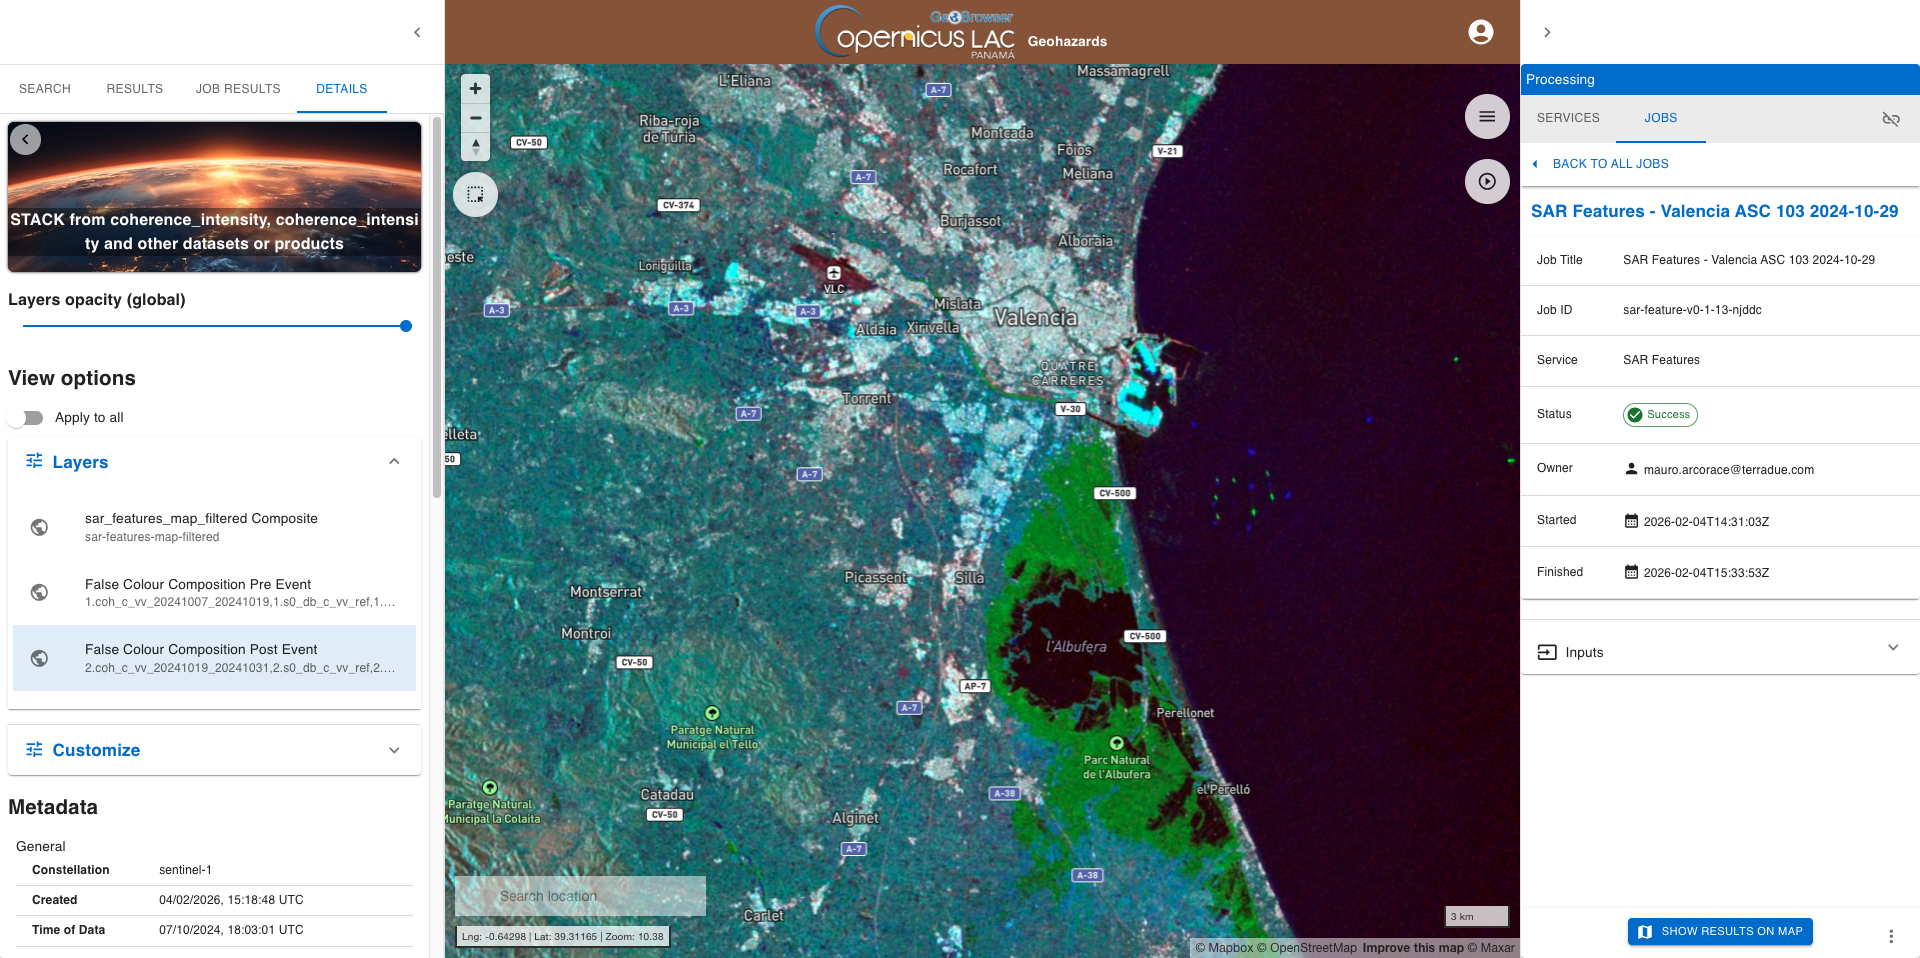
Select now the False Colour Composition Post Event layer.
Change the 3D view of the product and set the opacity as 50% from Raster Opacity to see the labels of the basemap layer.

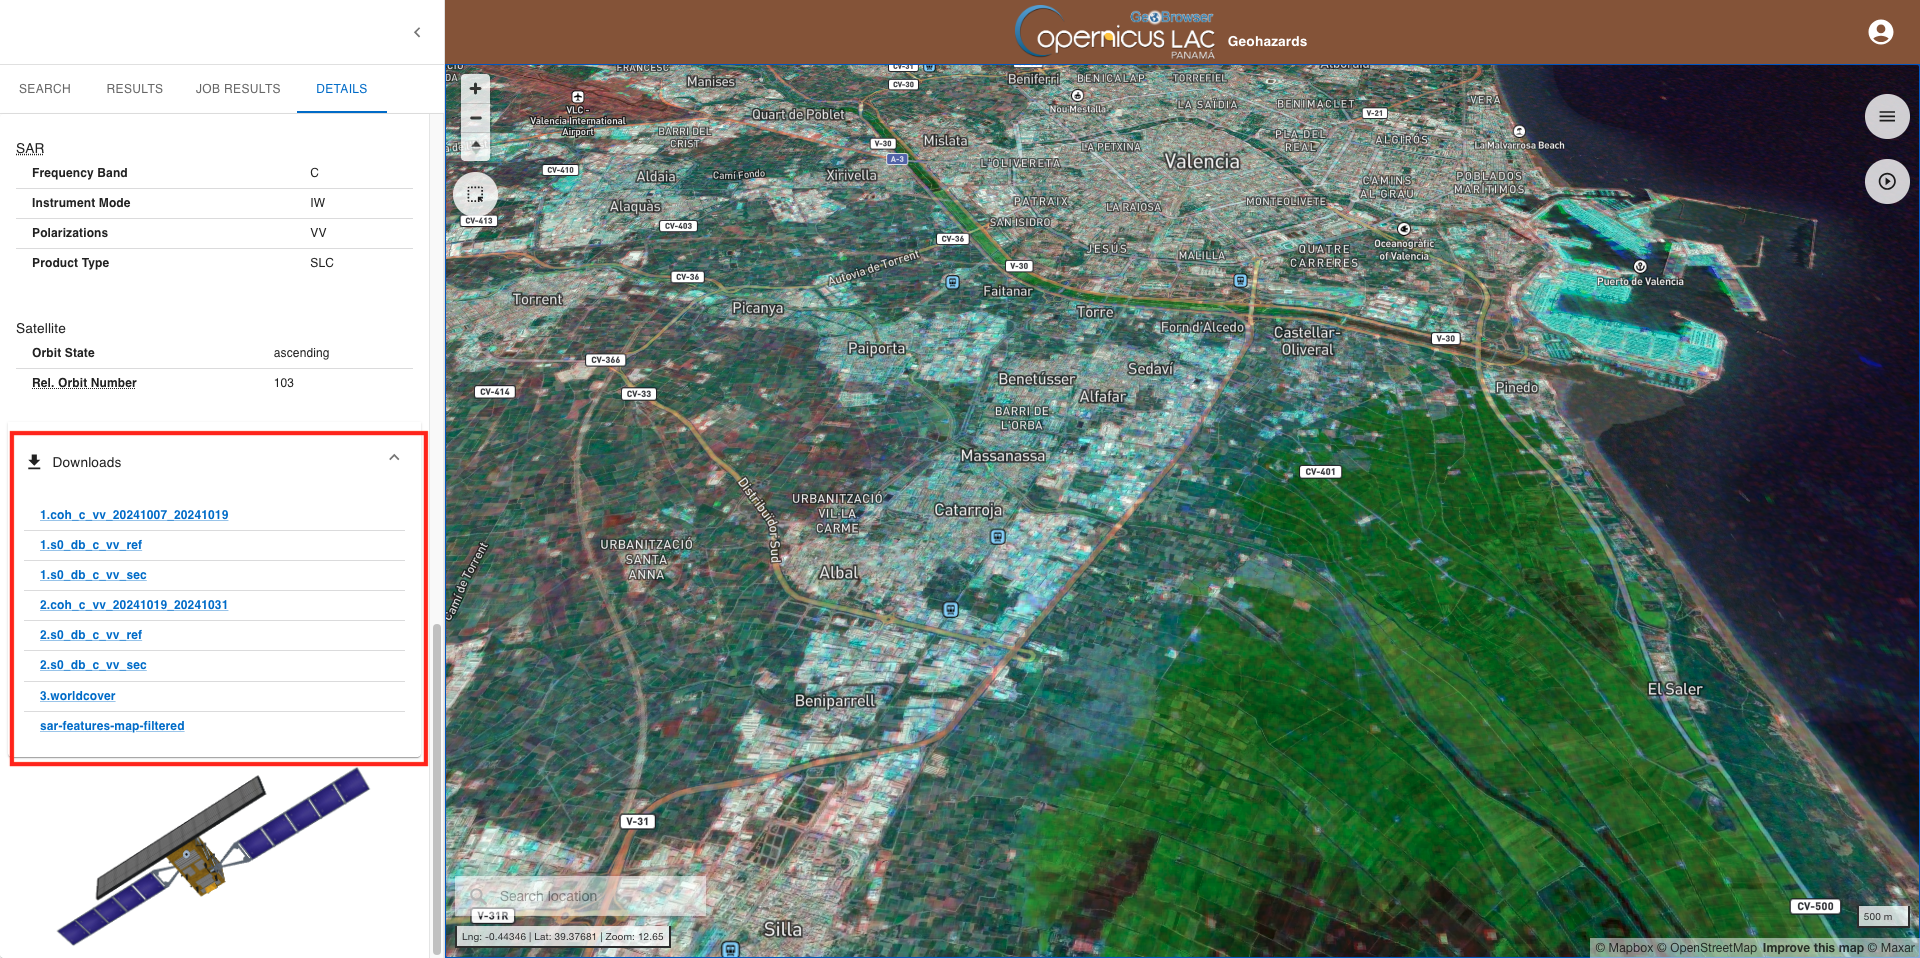
To download the product from the left panel click on the Downloads dropdown button and then on the hyperlink of the single asset.
Job resubmit
Aren't you happy with this result? Or, do you want to fine tune one of the employed parameters? If yes, it is possible to easily resubmit another job by clicking on the Resubmit button located on the bottom right corner of the JOBS tab in the right panel.
From this button it is also possible to copy to clipboard the parameters employed in this jobs and easily paste them while filling-in again the service form.
Extra material
Try employing the SAR Features service under the Flood scenario also over another area, or with the Generic scenario.
Below are shown multiple SAR features results obtained in both Flood and Generic scenarios that you can follow to get practice with this service.
SAR Features generic result - Kahramanmaras Earthquake in Turkey
SAR Features result over Kahramanmaras, Turkey Disasters Charter Activation: Kahramanmaras earthquakes in Türkiye - Feb 2023
Scenario: Generic
Event date: 6 Feb 2023
Input SAR SLC data: S1A SLC, DESCENDING, T21
Before-event: S1A_IW_SLC__1SDV_20230129T033427_20230129T033455_046993_05A2FE_6FF2, S1A_IW_SLC__1SDV_20230117T033426_20230117T033454_046818_059D16_1A0C
After-event: S1A_IW_SLC__1SDV_20230210T033426_20230210T033454_047168_05A8CD_FAA6
SAR Features change detection binary map
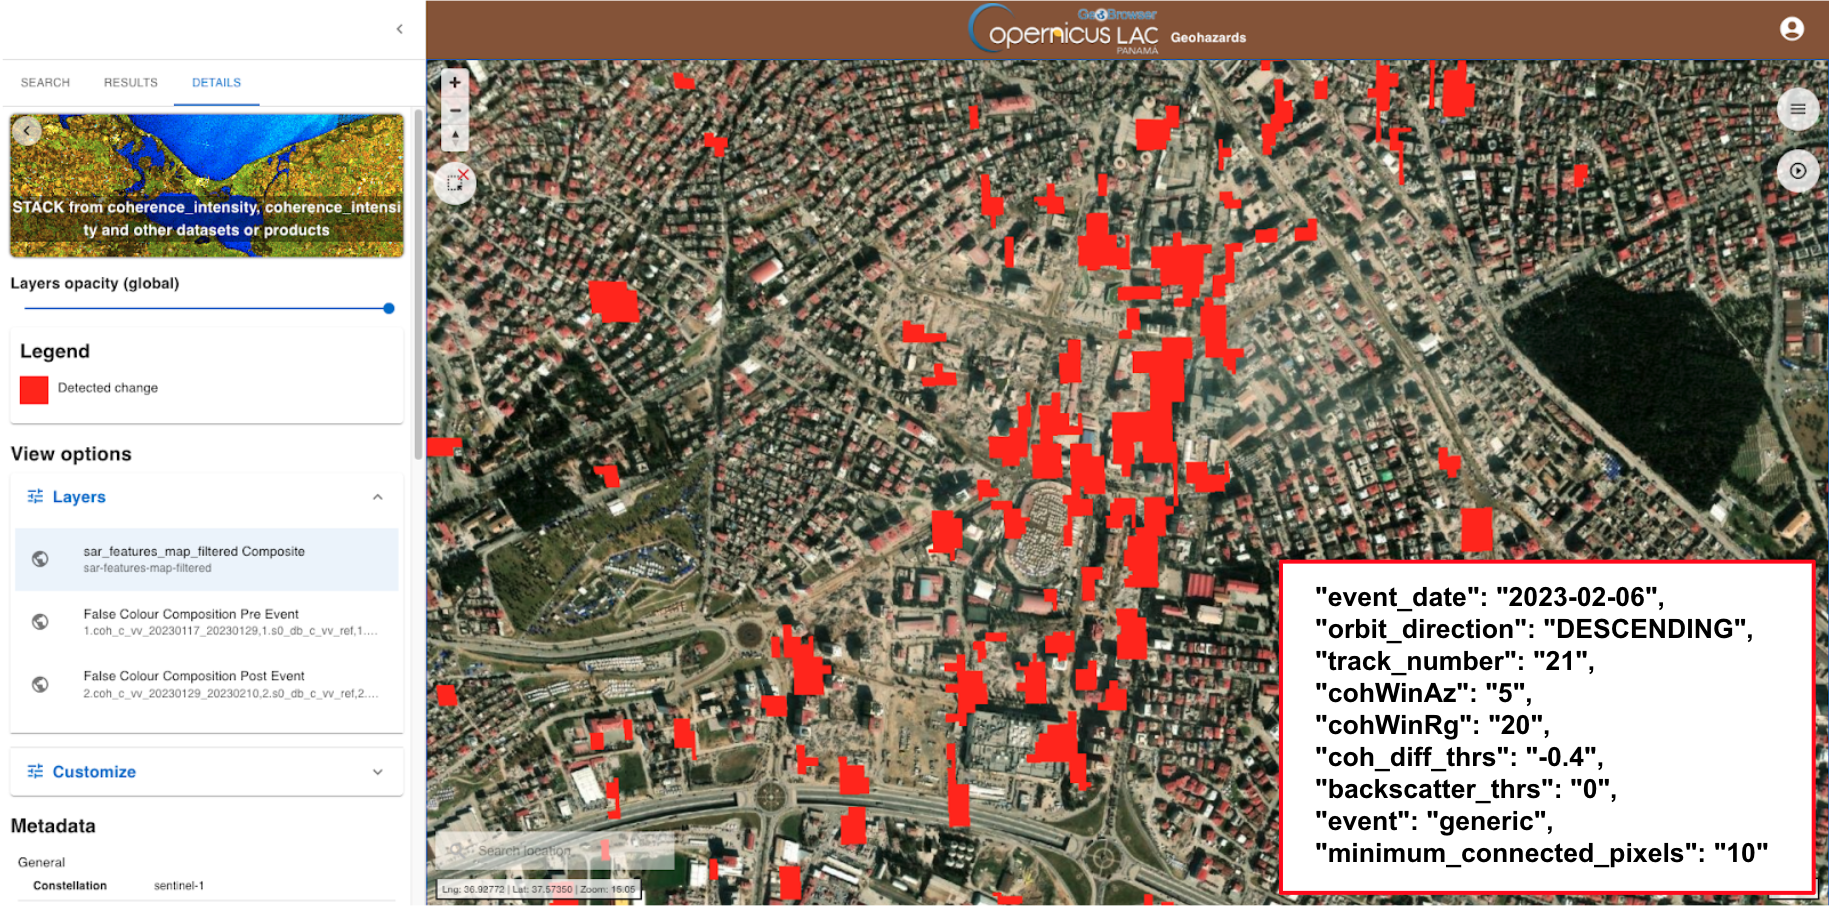
  "event_date": "2023-02-06",
  "orbit_direction": "DESCENDING",
  "track_number": "21",
  "cohWinAz": "5",
  "cohWinRg": "20",
  "coh_diff_thrs": "-0.4",
  "backscatter_thrs": "0",
  "event": "generic",
  "minimum_connected_pixels": "10"
SAR Features flood result - Flood in Itaqui, Brazil
SAR Features result over Itaqui, Brazil Disasters Charter Activation: Flood in Brazil - May 2024
Scenario: Flood
Event date: 8 May 2024
Input SAR SLC data: S1A SLC, DESCENDING, T170
Before-event: S1A_IW_SLC__1SDV_20240427T090549_20240427T090616_053617_0682A4_E29D, S1A_IW_SLC__1SDV_20240415T090548_20240415T090615_053442_067BC4_BB63
After-event: S1A_IW_SLC__1SDV_20240509T090549_20240509T090616_053792_068972_28D3
SAR Features classified map
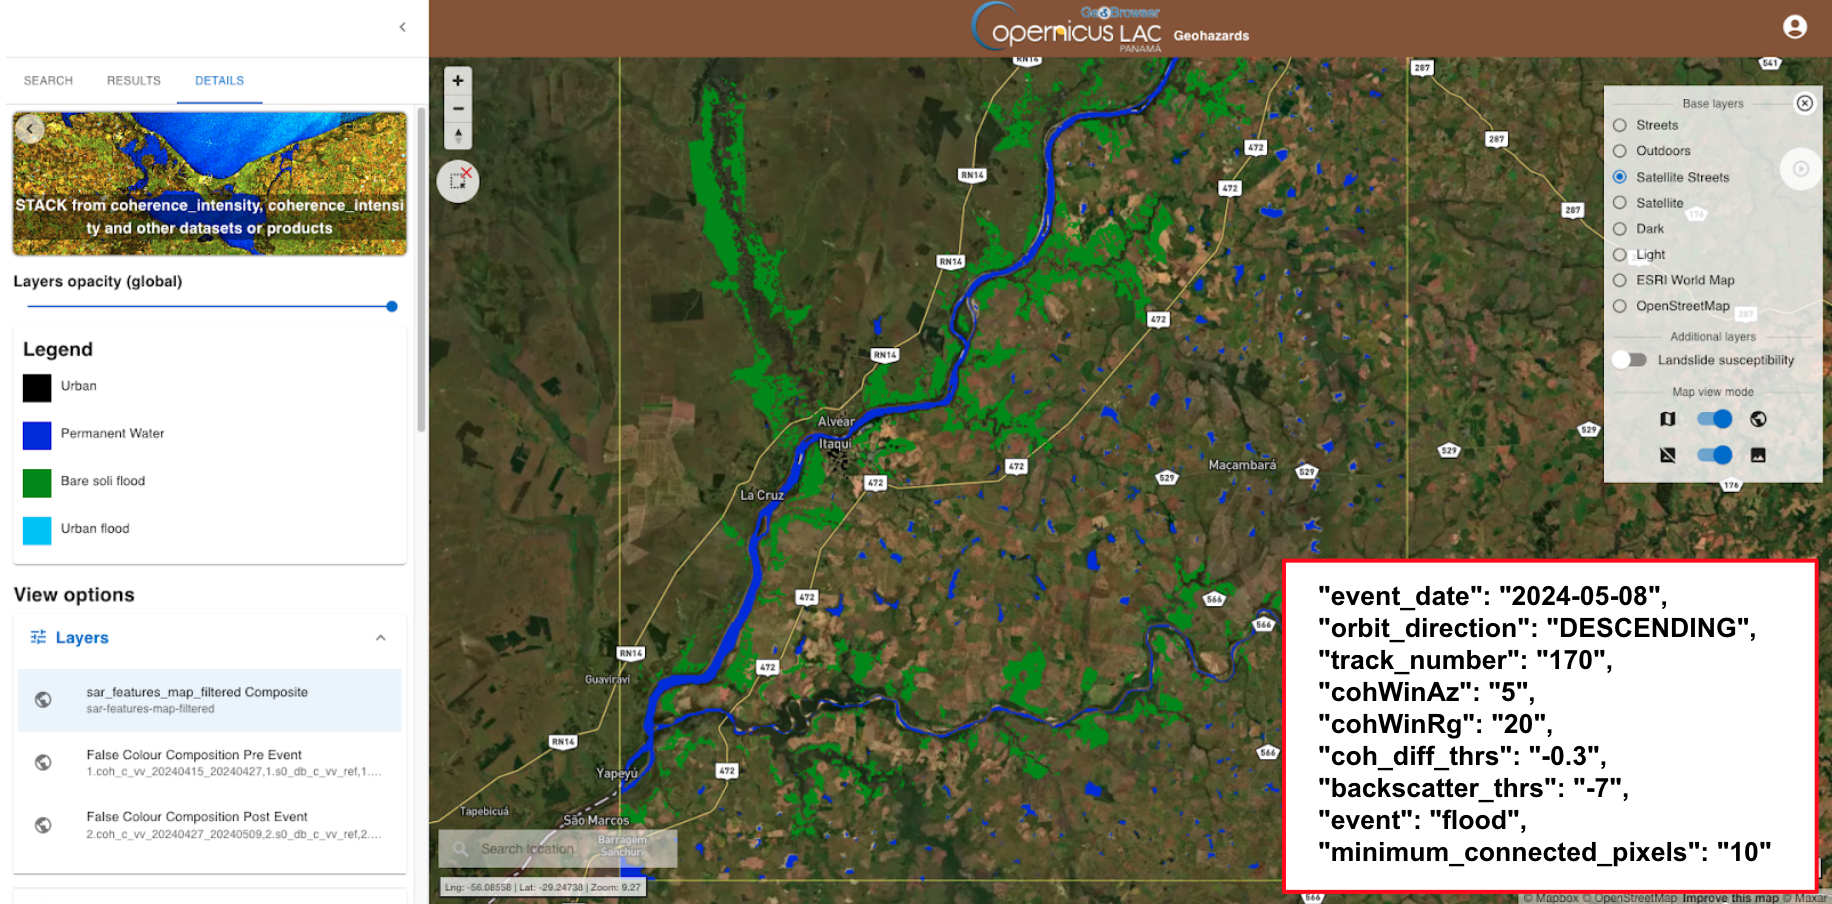
Params:
  "event_date": "2024-05-08",
  "orbit_direction": "DESCENDING",
  "track_number": "170",
  "cohWinAz": "5",
  "cohWinRg": "20",
  "coh_diff_thrs": "-0.3",
  "backscatter_thrs": "-7",
  "event": "flood",
  "minimum_connected_pixels": "10"
SAR Features generic result - Earthquake in Mandalay Myanmar
SAR Features result over Mandalay, Myanmar Disasters Charter Activation: Earthquake in Myanmar - Mar 2025
Scenario: Generic
Event date: 25 Mar 2025
Input SAR SLC data: S1A SLC, ASCENDING, T70
Before-event: S1A_IW_SLC__1SDV_20250322T113935_20250322T114002_058417_073988_9F68, S1A_IW_SLC__1SDV_20250310T113934_20250310T114001_058242_07329D_35D1
After-event: S1A_IW_SLC__1SDV_20250403T113935_20250403T114002_058592_074094_0591
SAR Features change detection binary map
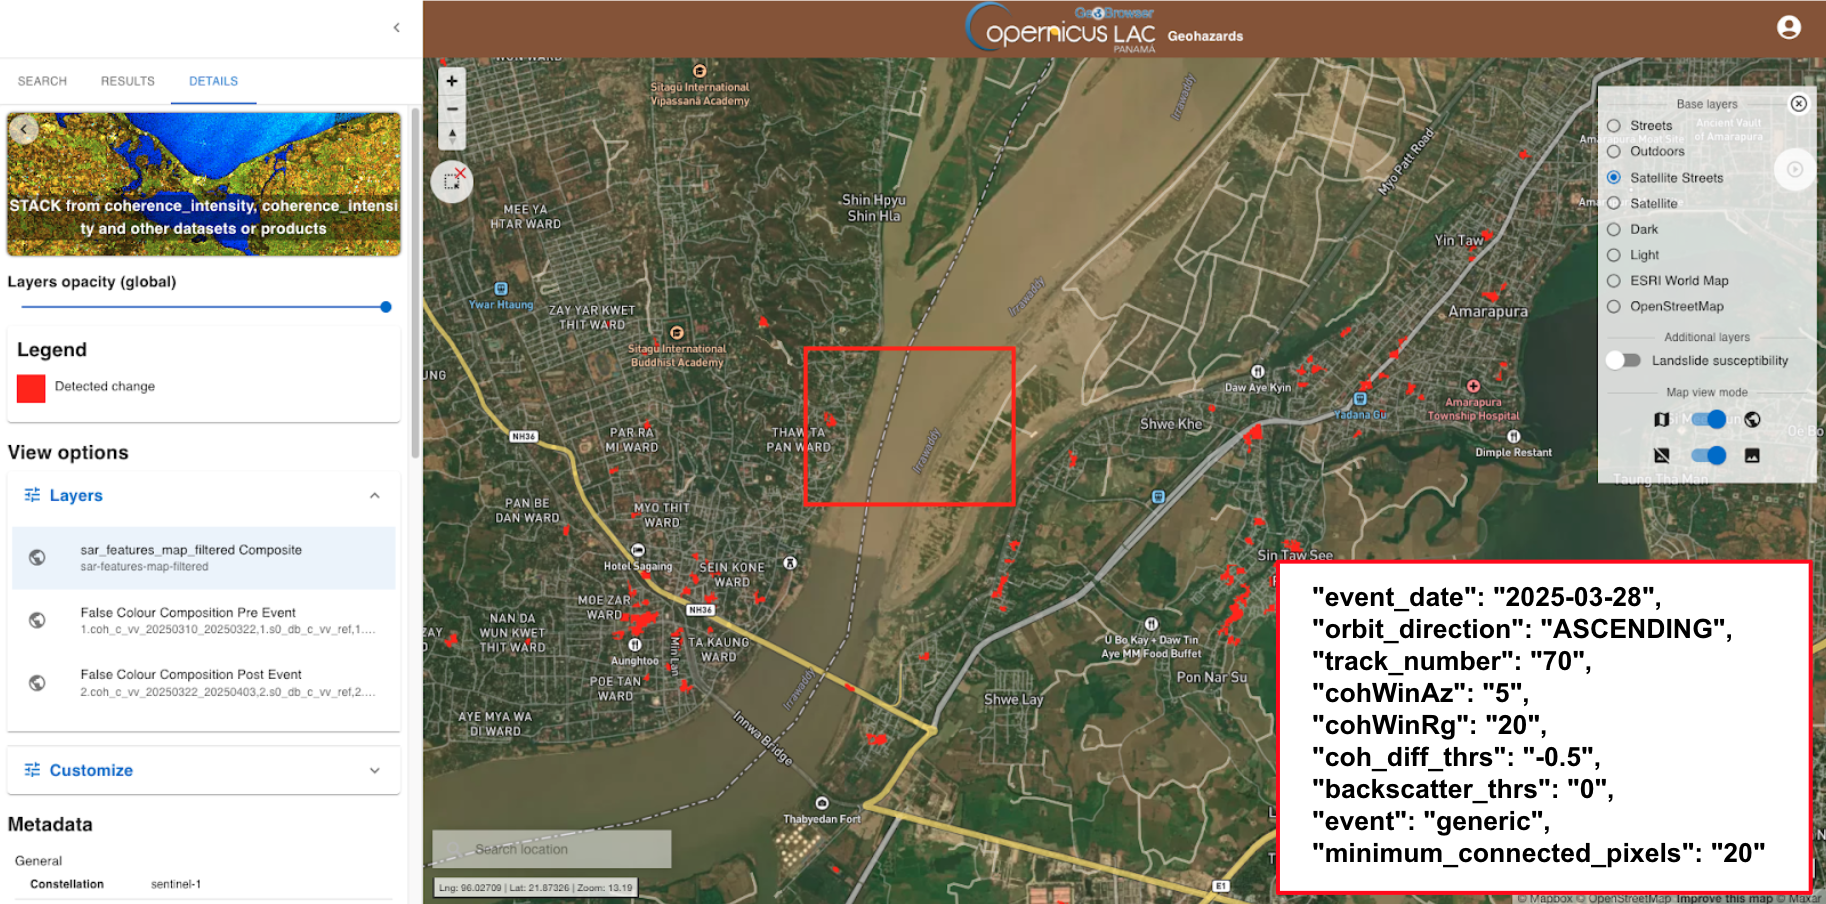
  "event_date": "2025-03-28",
  "orbit_direction": "ASCENDING",
  "track_number": "70",
  "cohWinAz": "5",
  "cohWinRg": "20",
  "coh_diff_thrs": "-0.5",
  "backscatter_thrs": "0",
  "event": "generic",
  "minimum_connected_pixels": "20"
SAR Features flood result - Flood in Maiduguri, Nigeria
SAR Features result over Itaqui, Brazil Disasters Charter Activation: Flood in Brazil - Sep 2024
Scenario: Flood
Event date: 14 Sep 2024
Input SAR SLC data: S1A SLC, DESCENDING, 153
Before-event: S1A_IW_SLC__1SDV_20240917T045539_20240917T045606_055700_06CD64_7127, S1A_IW_SLC__1SDV_20240905T045538_20240905T045606_055525_06C676_DF4B
After-event: S1A_IW_SLC__1SDV_20240929T045539_20240929T045606_055875_06D452_F311
SAR Features classified map

Params:
  "event_date": "2024-09-14",
  "orbit_direction": "DESCENDING",
  "track_number": "153",
  "cohWinAz": "5",
  "cohWinRg": "20",
  "coh_diff_thrs": "-0.25",
  "backscatter_thrs": "-7",
  "event": "flood",
  "minimum_connected_pixels": "10"